Function Calling
Function calling (aka “tool calling”) helps you get consistent structured data from LLMs. It lets you call custom functions, interact with external APIs, and generally turn natural language into something code can understand.
But, don’t be misled by the name—this feature doesn’t actually call functions for you.
Instead, it creates a JSON object with the name of the function to call and the arguments to pass, which you can use to trigger functions in your code. OpenAI models generate this JSON based on the tools you define with the tools parameter in the API.
So now that we’ve cleared that part, let’s learn how you can use function calling with Chat Models in Vellum.
Using Function Calling in Vellum
In this tutorial, we cover how function calling works and how to use it in Vellum Workflows:
By the end of this tutorial, you’ll learn to do four tasks in Vellum:
Define function callsin a Prompt Node within Workflows;- Enable your models to
auto-select or enforce the executionof a function response; - Pass
Function Call outputsfrom a Workflow to your code; Run functionswith the provided arguments.
💡 Keep in mind that although we’ll run some arbitrary functions to close the response loop, we won’t go into much detail on how to call external APIs using the generated arguments.
Outline
For this tutorial, we’ll create an AI-powered customer chatbot for a smartphone outlet, that will have two tools (or functions) defined:
delivery_data- This function will require three parameters:
Phone, which returns the phone’s name,Location, which returns the user’s location, andCondition, which returns the phone’s condition.
- This function will require three parameters:
call_agent- This one accepts one parameter:
Questionwhich is the user’s query.
- This one accepts one parameter:
💡 This tutorial demonstrates how to define function calling messages in Prompt Nodes within Workflows. However, they can also be configured in Prompt Variants within a Prompt Sandbox.
Step 1: Setting up Messages and Conversation History
To setup an OpenAI API call in Vellum, we’ll be using a Prompt Node. This node enables the configuration of all parameters required for an OpenAI API call.
We begin by adding the Prompt Node in the Workflow:
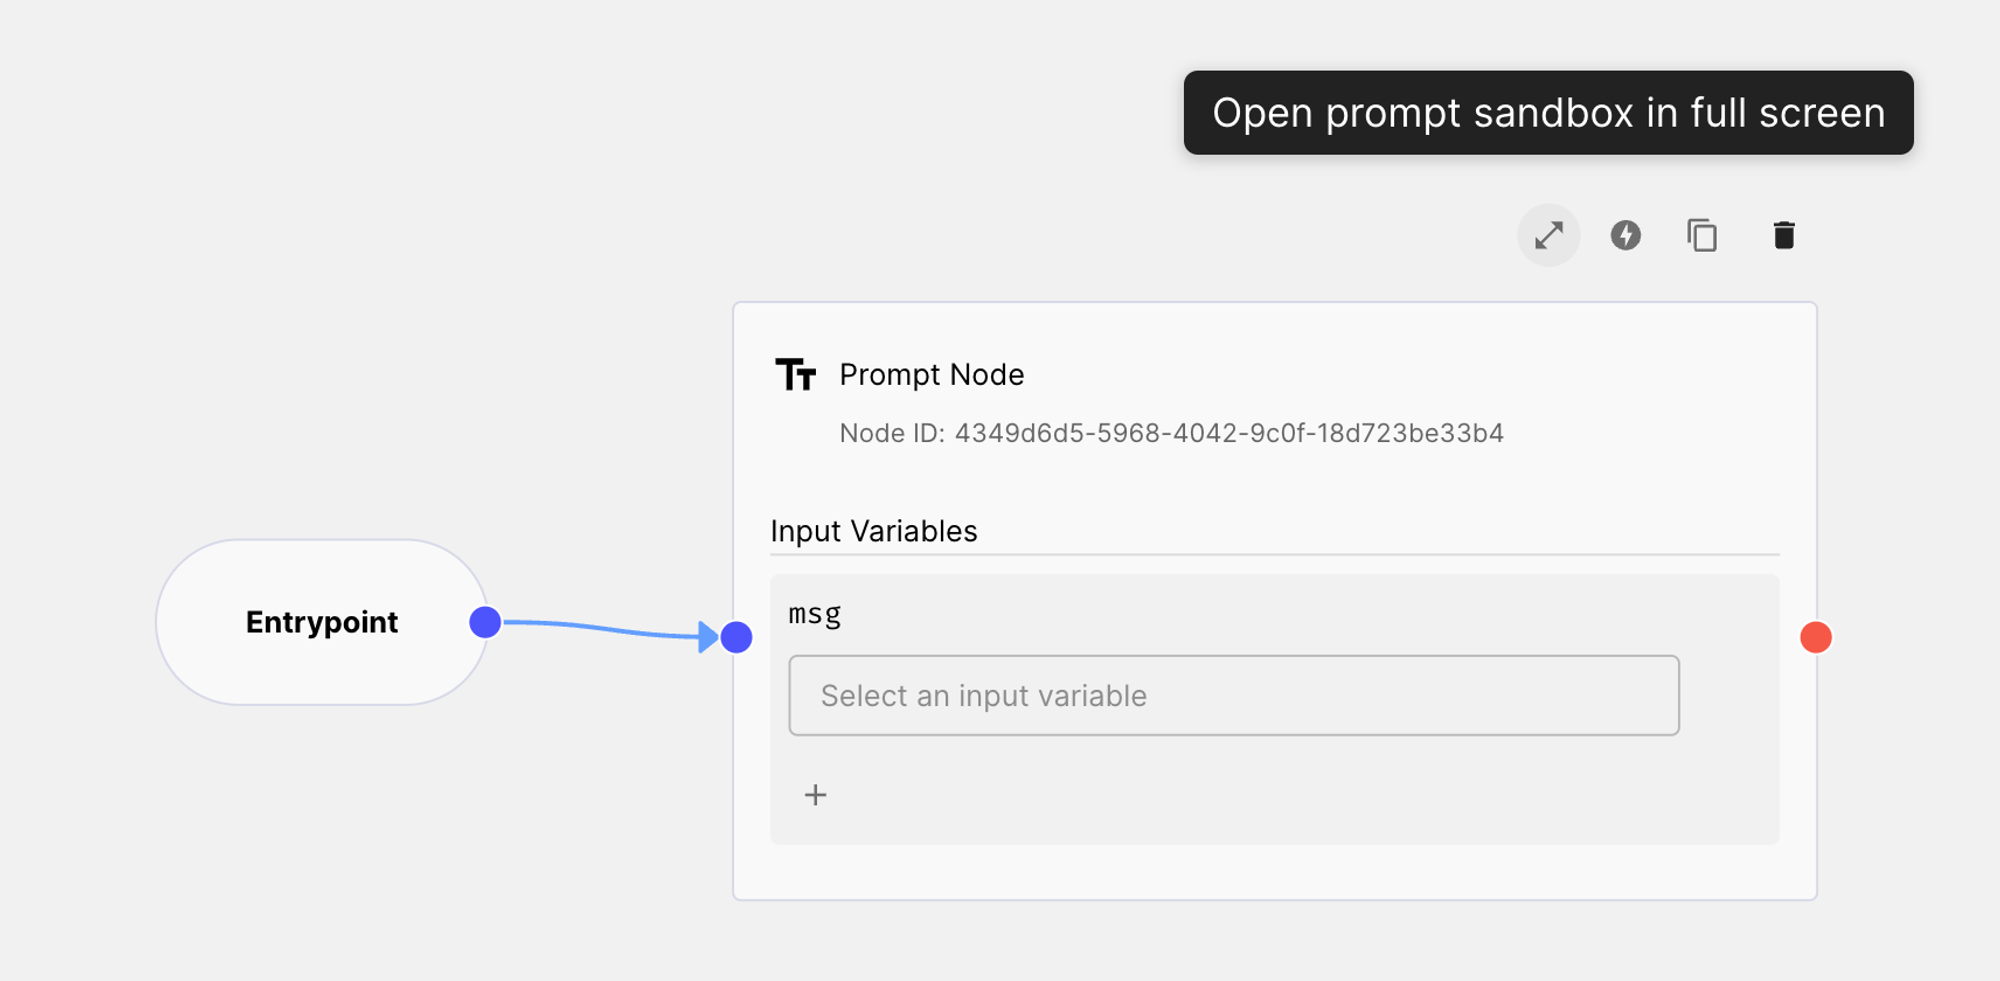
To edit the Prompt Node, just click on the “expand” icon like on the image above.
Now let’s set up the messages.
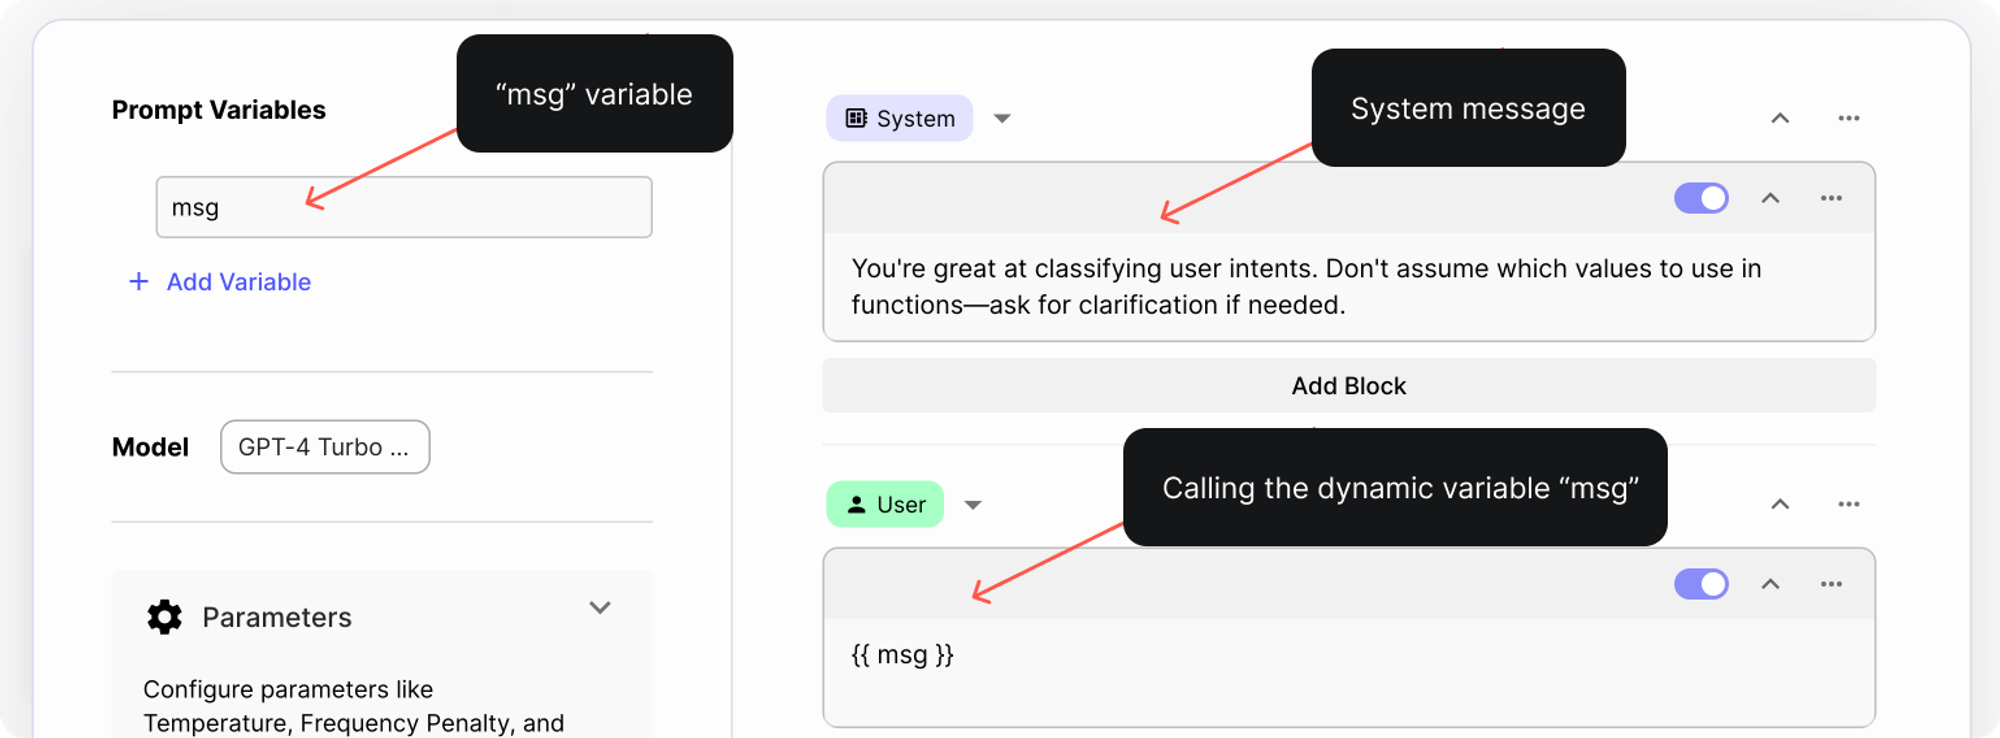
System Message
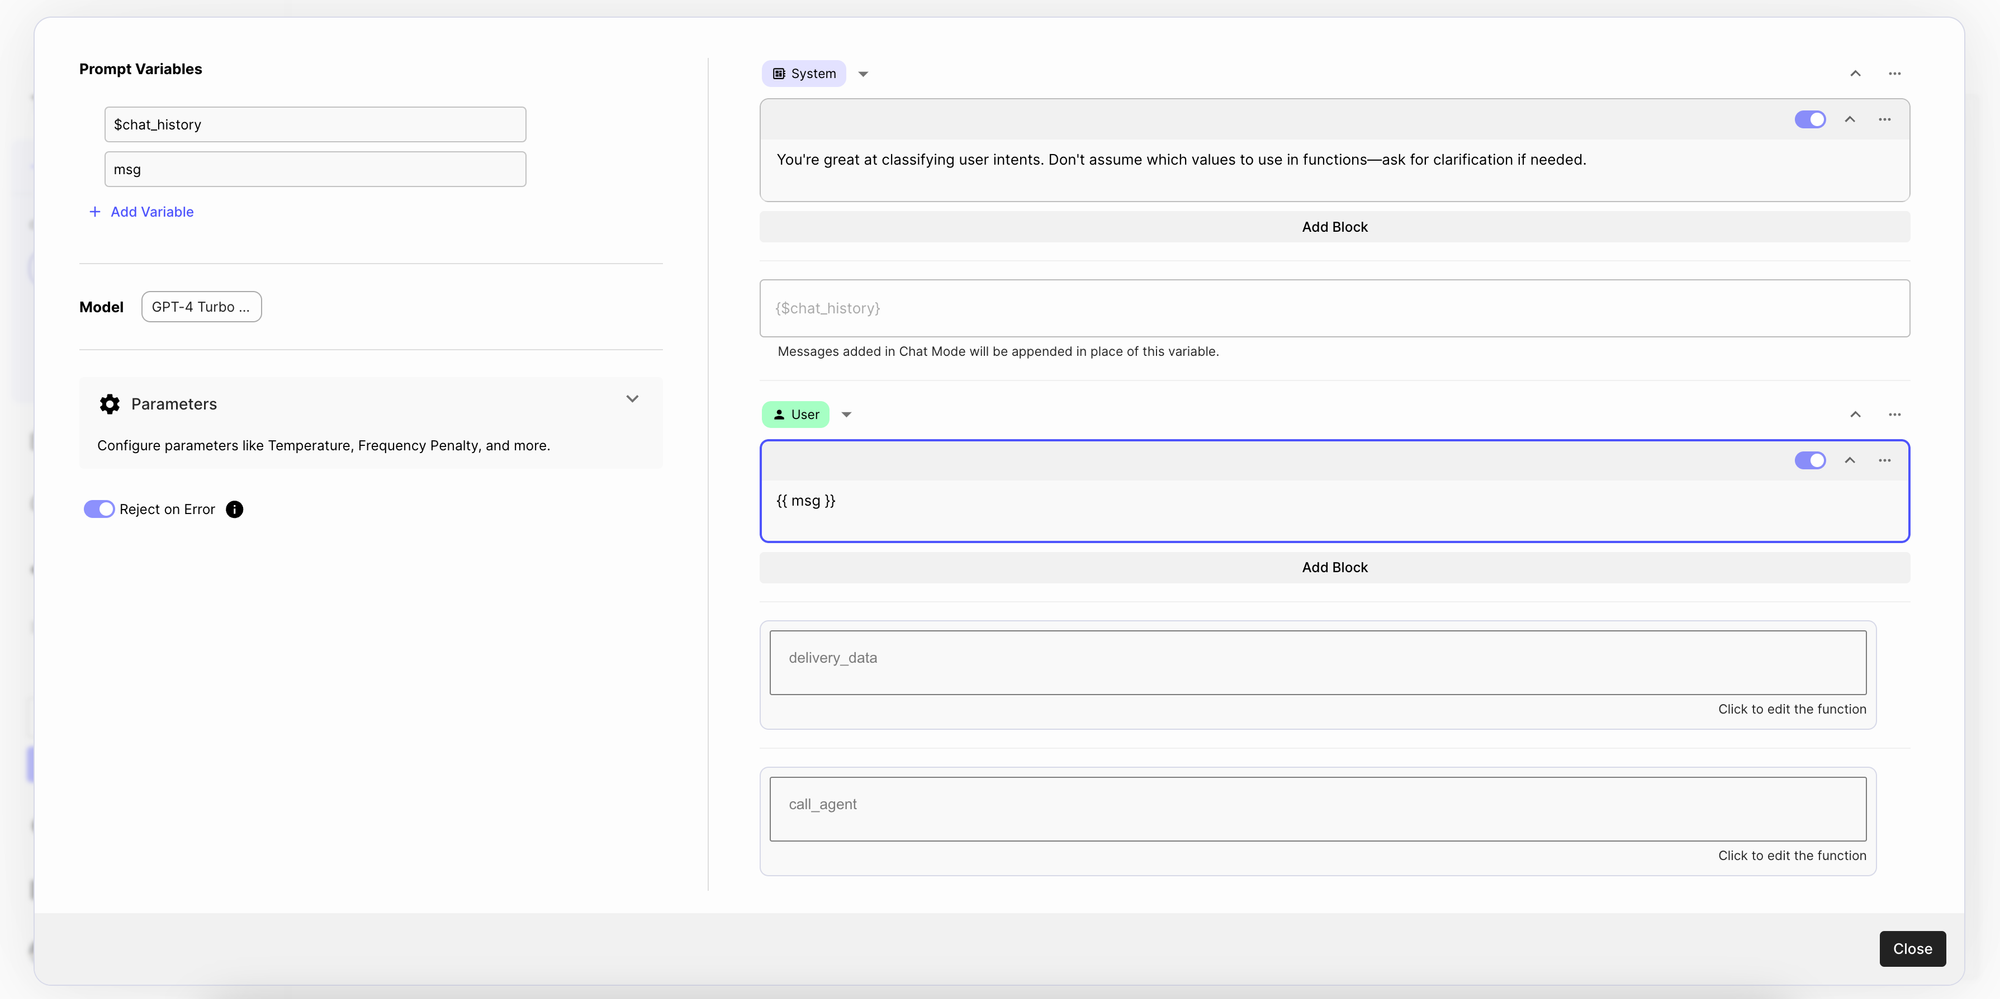
First we’ll start by adding a system message that tells the model to classify user intents. These models can hallucinate, so we’ll explicitly tell the model to ask for clarification if there’s incomplete information. Here’s the system message we used:
💬 You’re great at classifying user intents. Don’t assume which values to use in functions—ask for clarification if needed.
User Message
Next, we’ll create a dynamic variable msg , and add it in the user message to ensure it automatically updates with the variable’s content.
Here’s what the Prompt Node looks like once we’ve added the System and the User message:
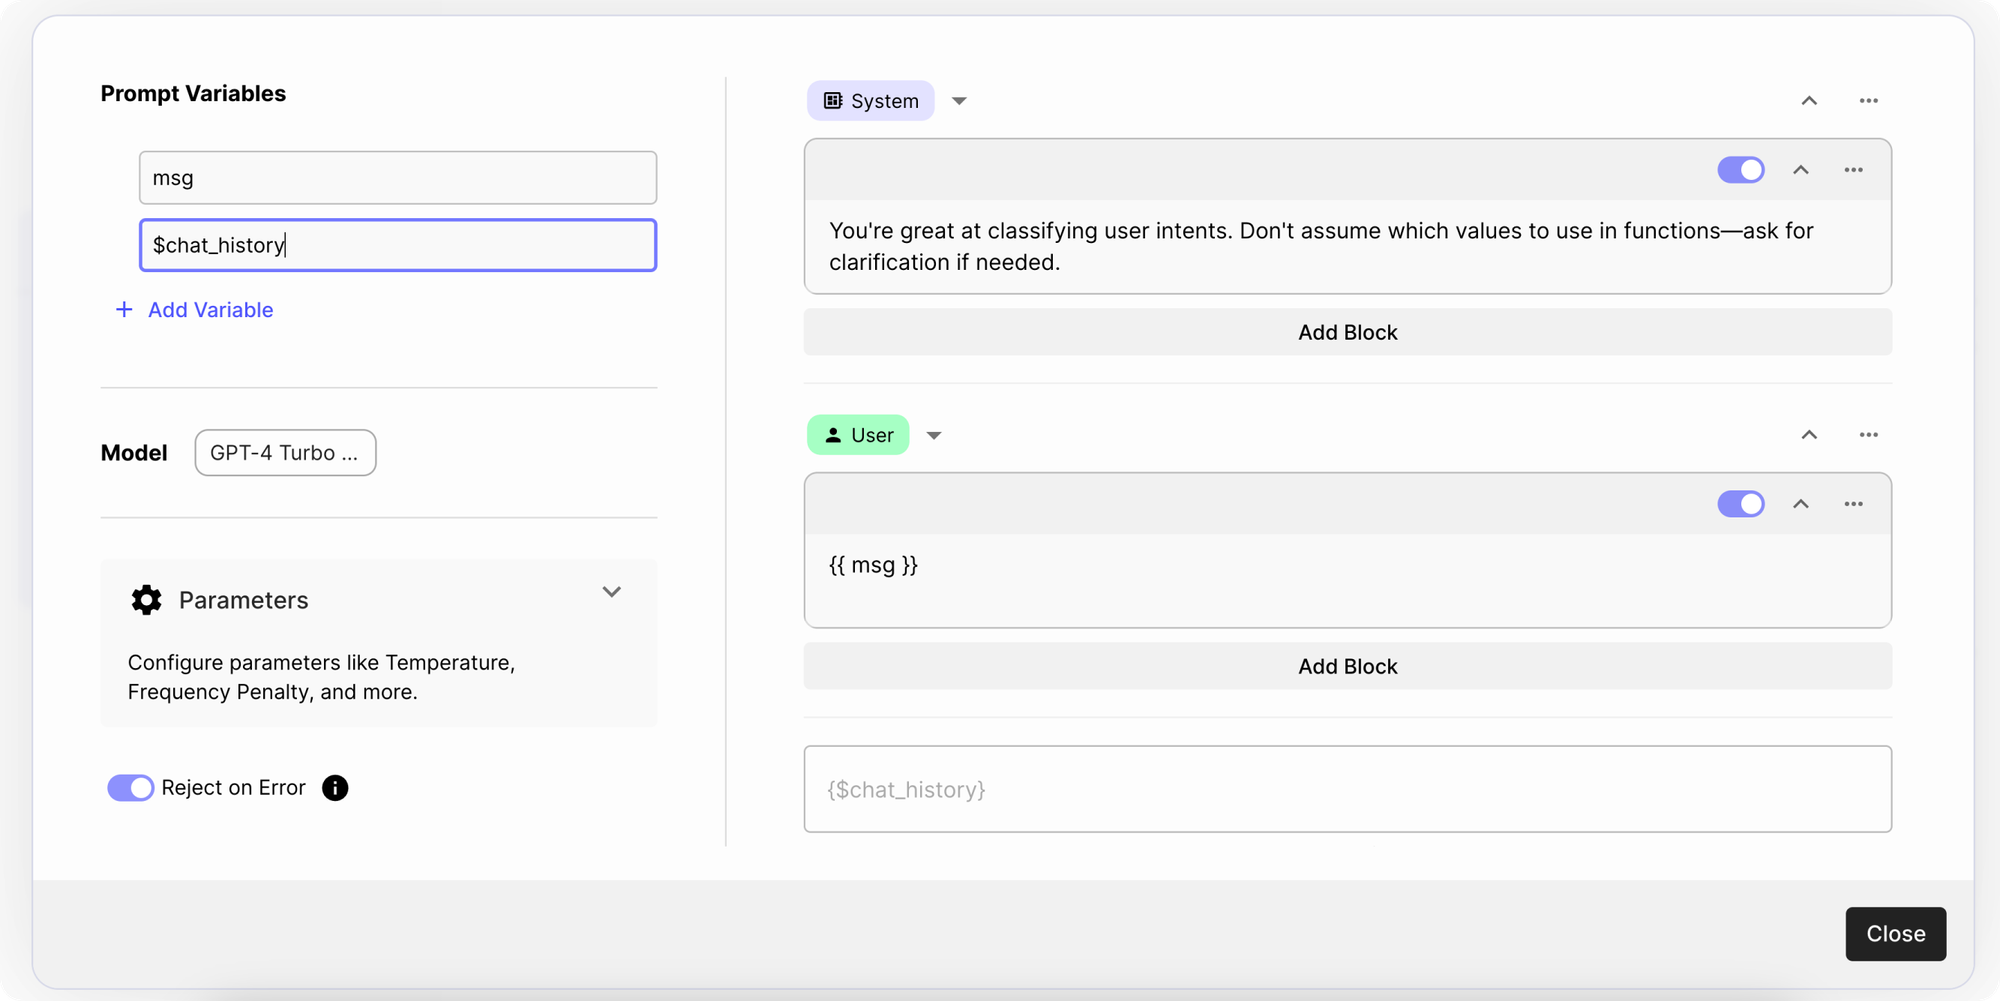
Chat Mode
To use function calling with Chat Models, you first need to set up three things in the Prompt Node:
- Chat history variable: Simply click on
Add Variableand write$chat_history - Chat generation model: Click on the model dropdown and select the latest GPT-4 turbo model, or
GPT-4 Turbo 04/09/2024 - Chat history block: Click on the “Add” dropdown on the right, and select “Add Chat History”
Here’s what the prompt should look like after you’ve completed the final step:
Now let’s set up the functions.
Step 2: Defining Function Calls
To include a Function block, simply select it from the “Add” dropdown menu. Once added, you’ll notice a grayed out box that says “todo”:
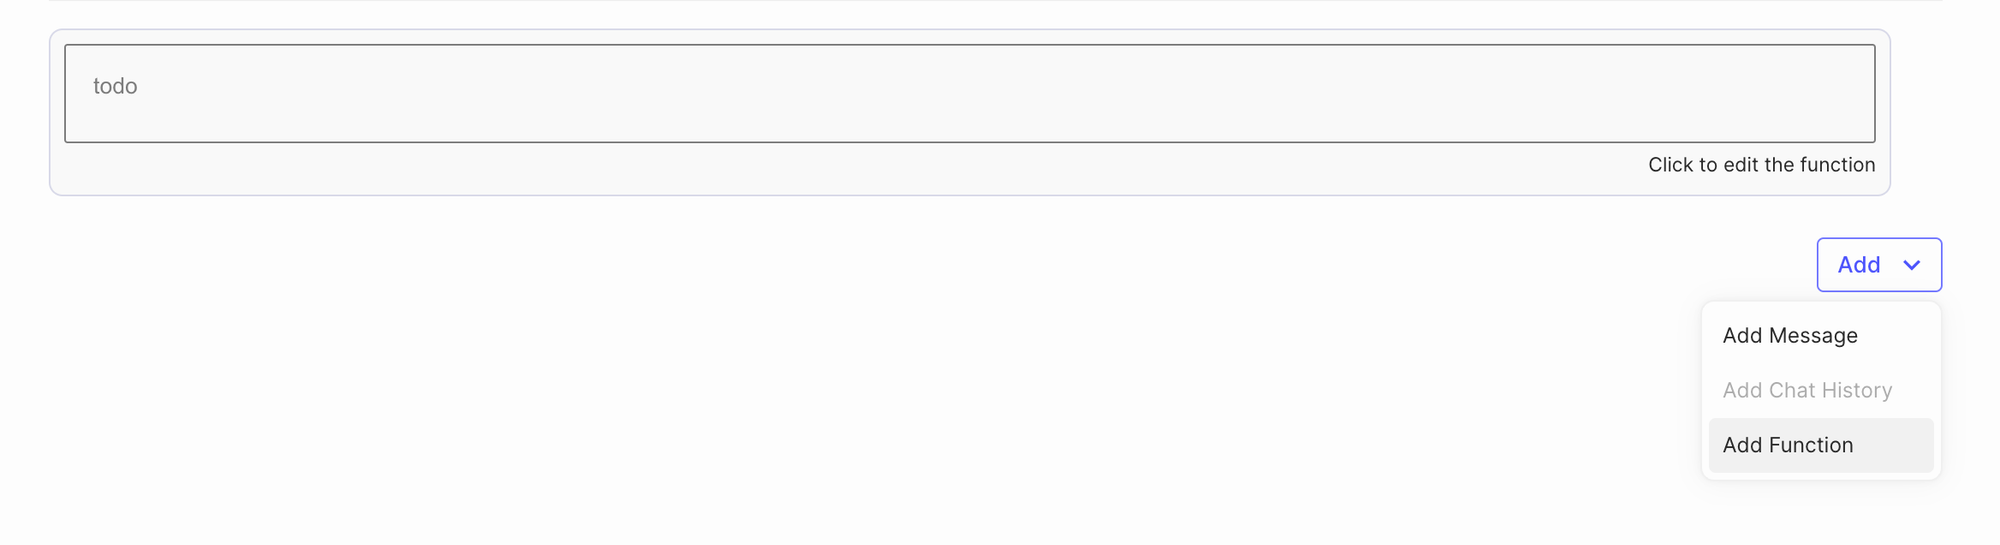
When you click that box, you can change the function’s name and add a custom description and parameters:
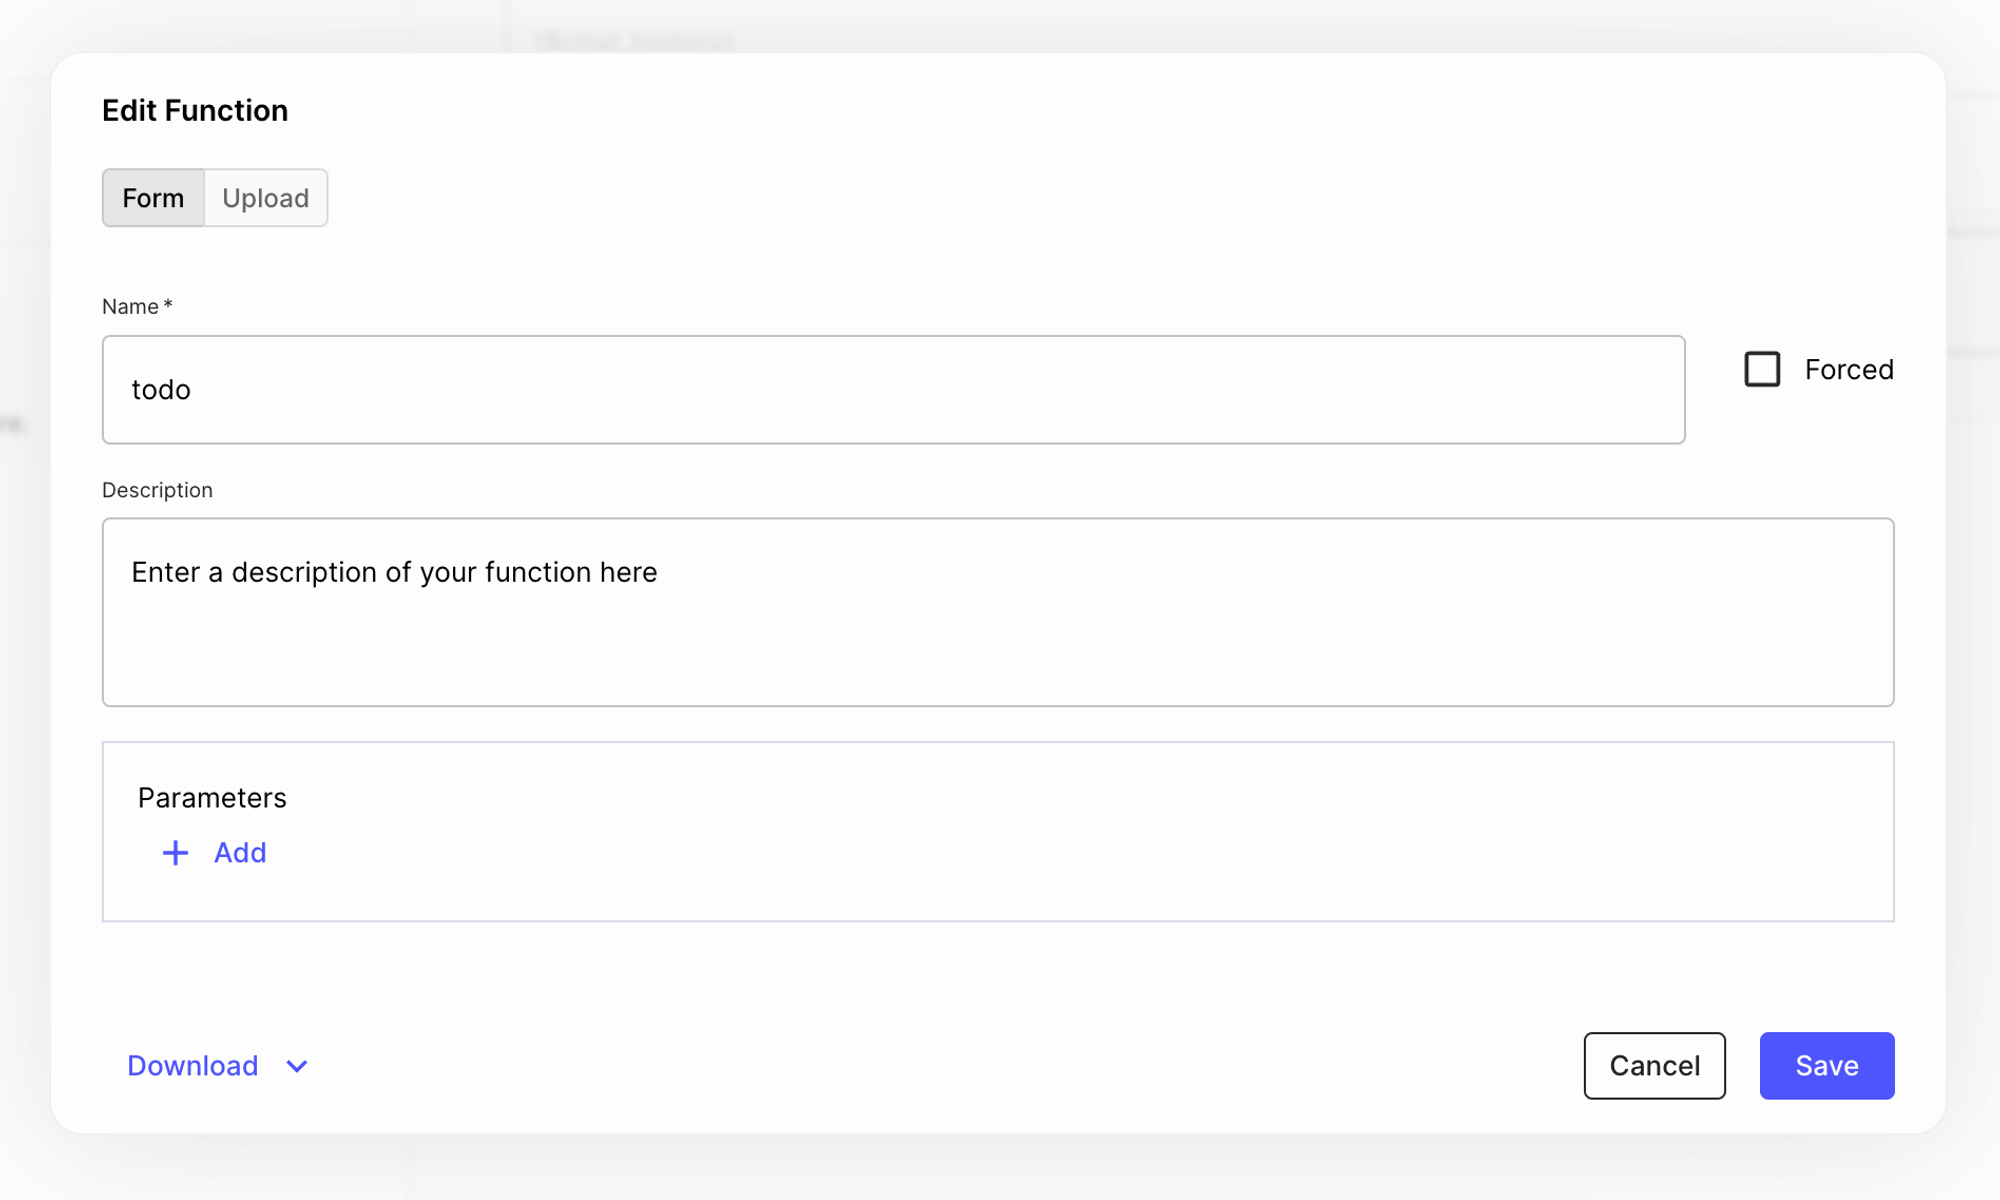
You’ll notice there are two options available to define these functions: Form and Upload. The Form option allows you to define your function calling message using the UI, while the Upload option enables you to upload a JSON or YAML file. The uploaded file will automatically map its values to the fields.
You might upload a file if you already have your functions defined in in your codebase and want to track their source of truth there.
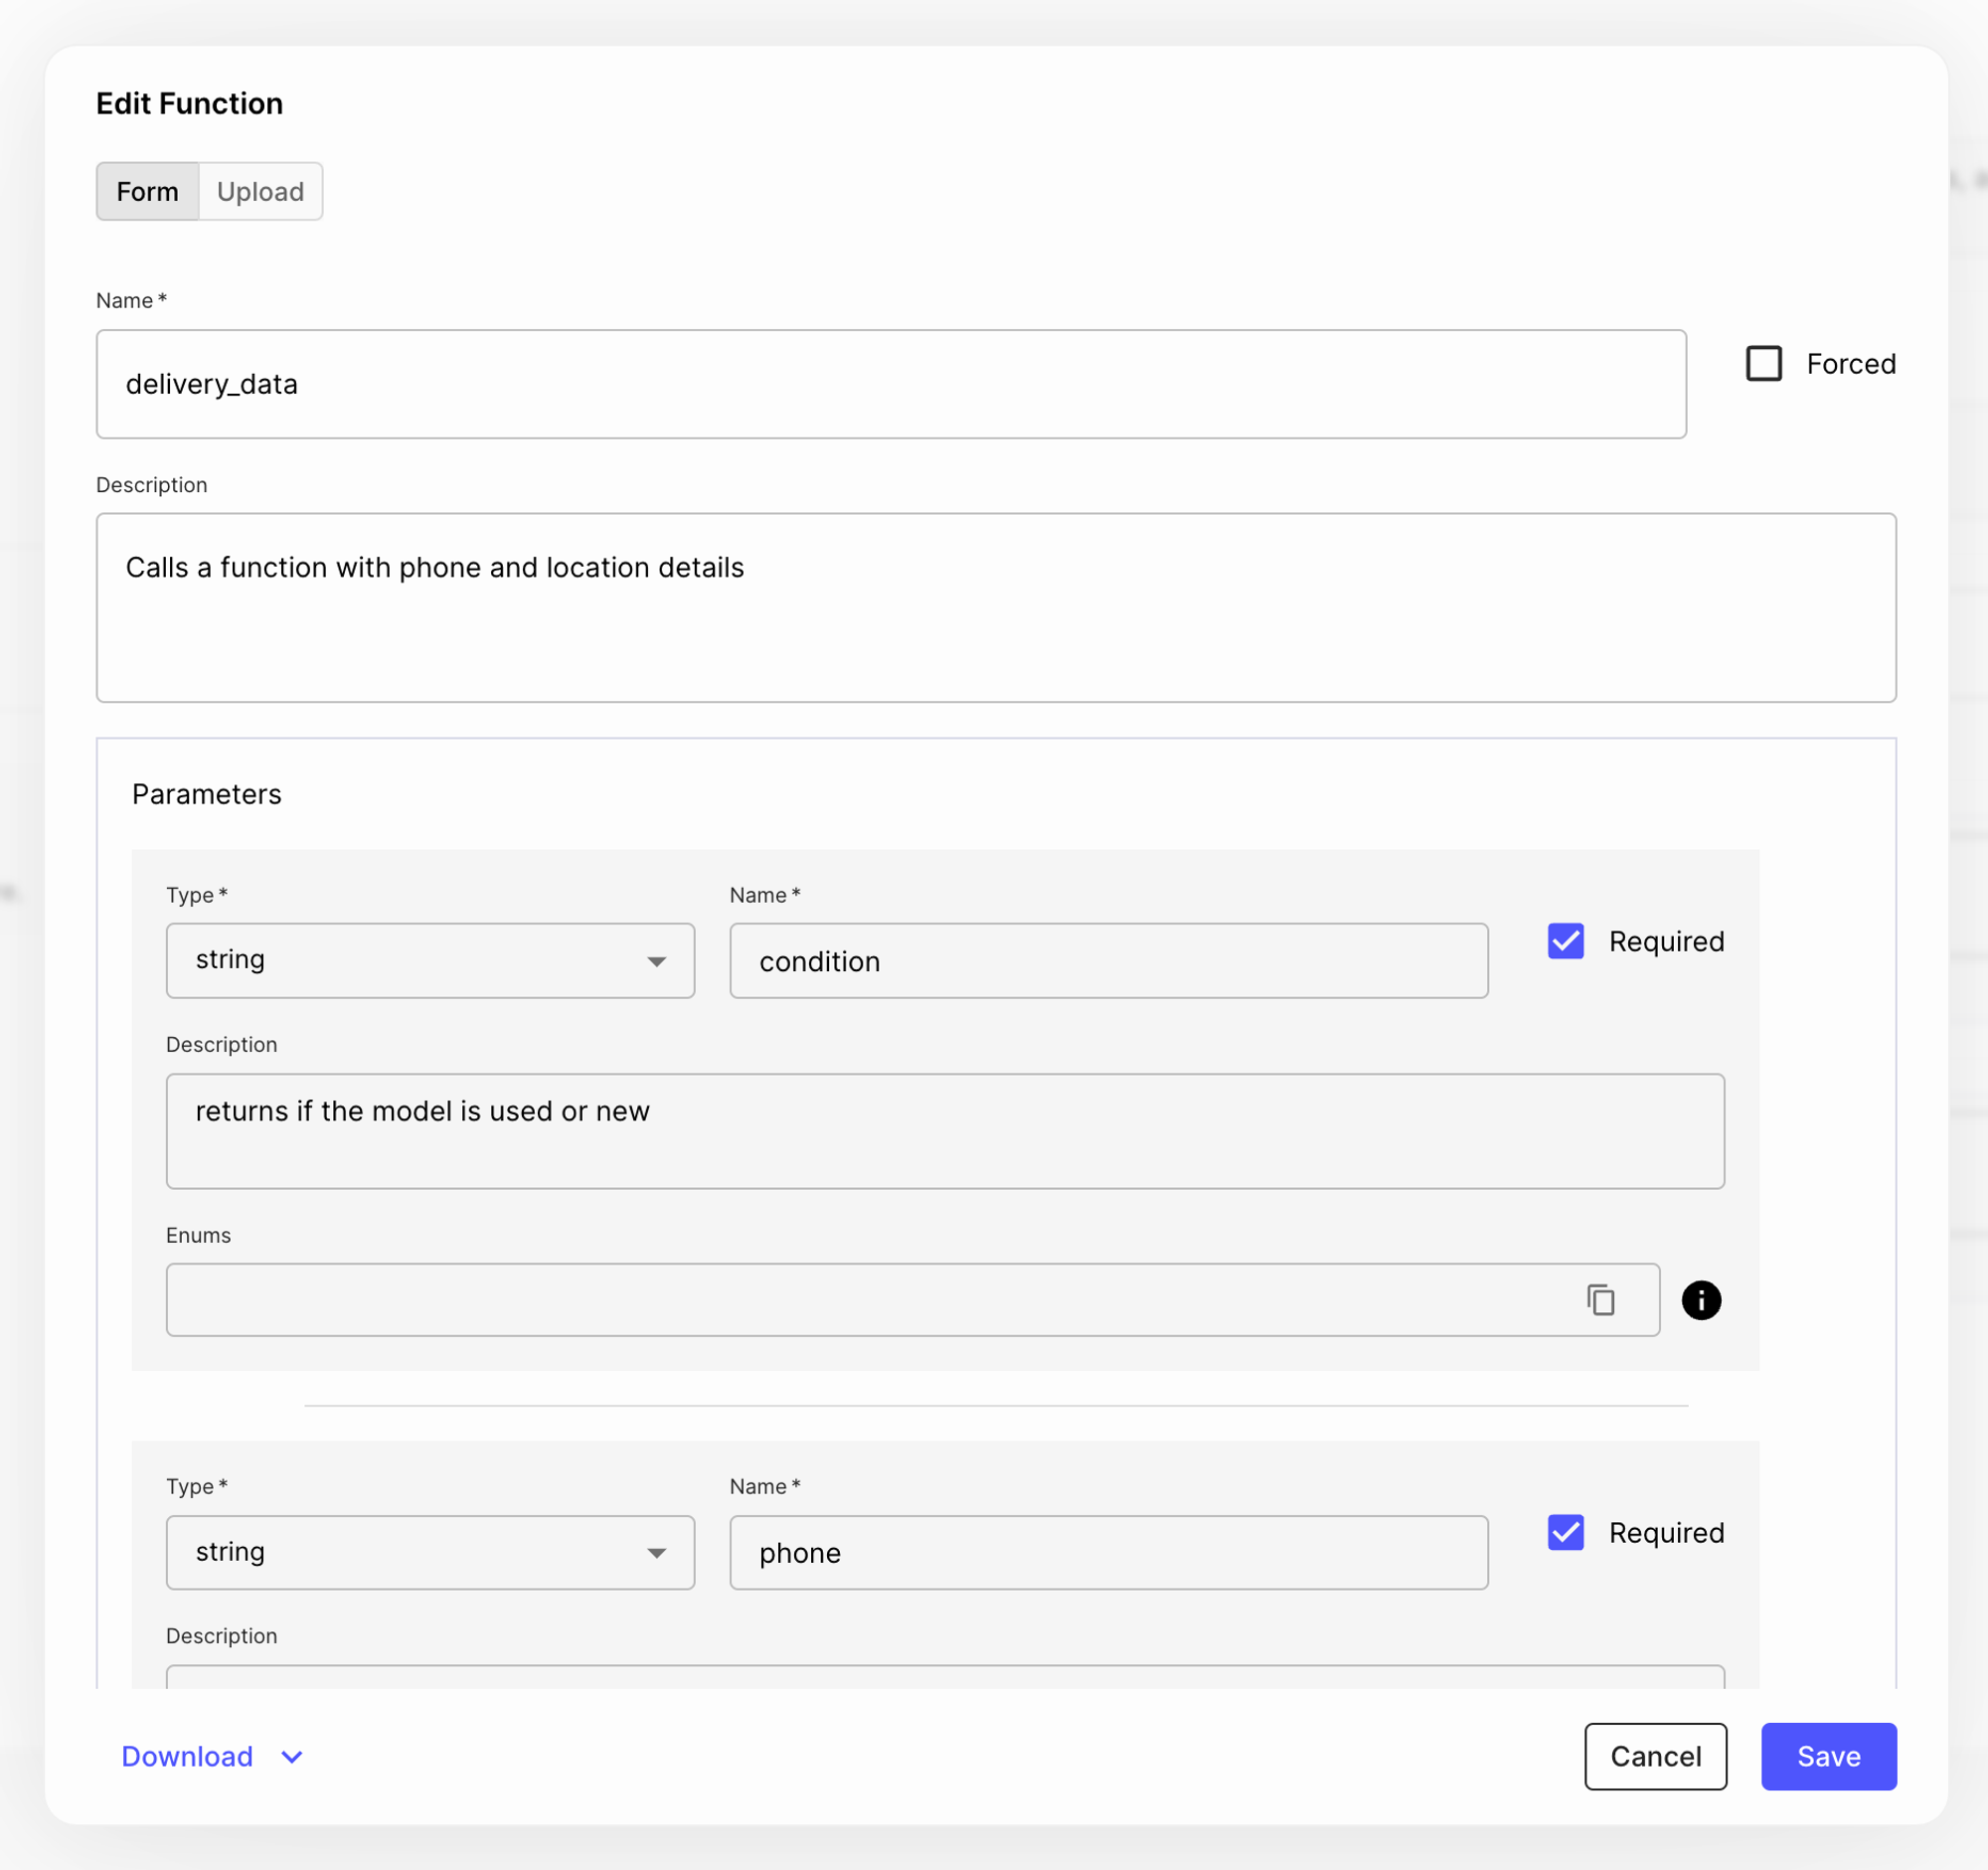
In this tutorial, we’ll upload this JSON file for the delivery_data function that has three properties (condition, phone, location):
Also, notice that all of these are required, so the model needs to collect all three in order to generate the response. Here’s what the UI returned:
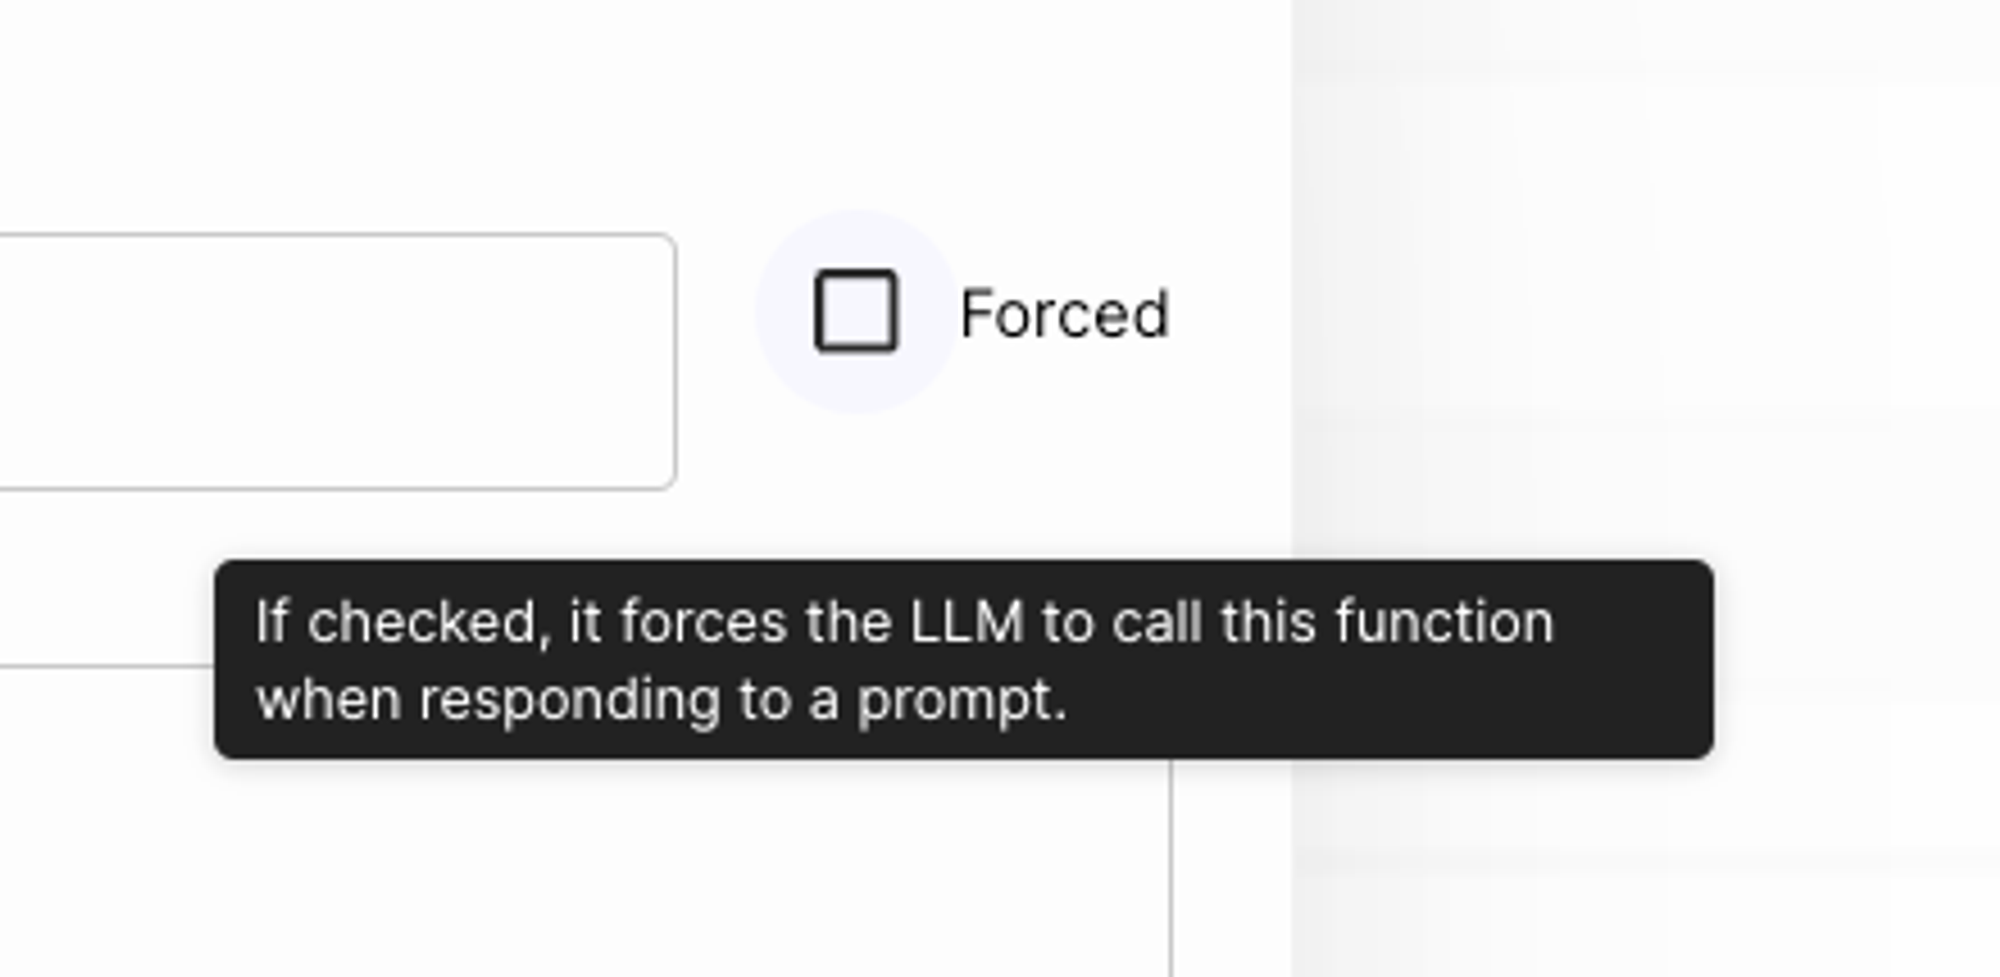
Have in mind that you can also check the “Forced” box to ensure the model always uses this function. If left unchecked, the model will decide which function to use based on the user query. OpenAI’s latest models are quite good at making the right choice, so we’ll leave it unchecked.
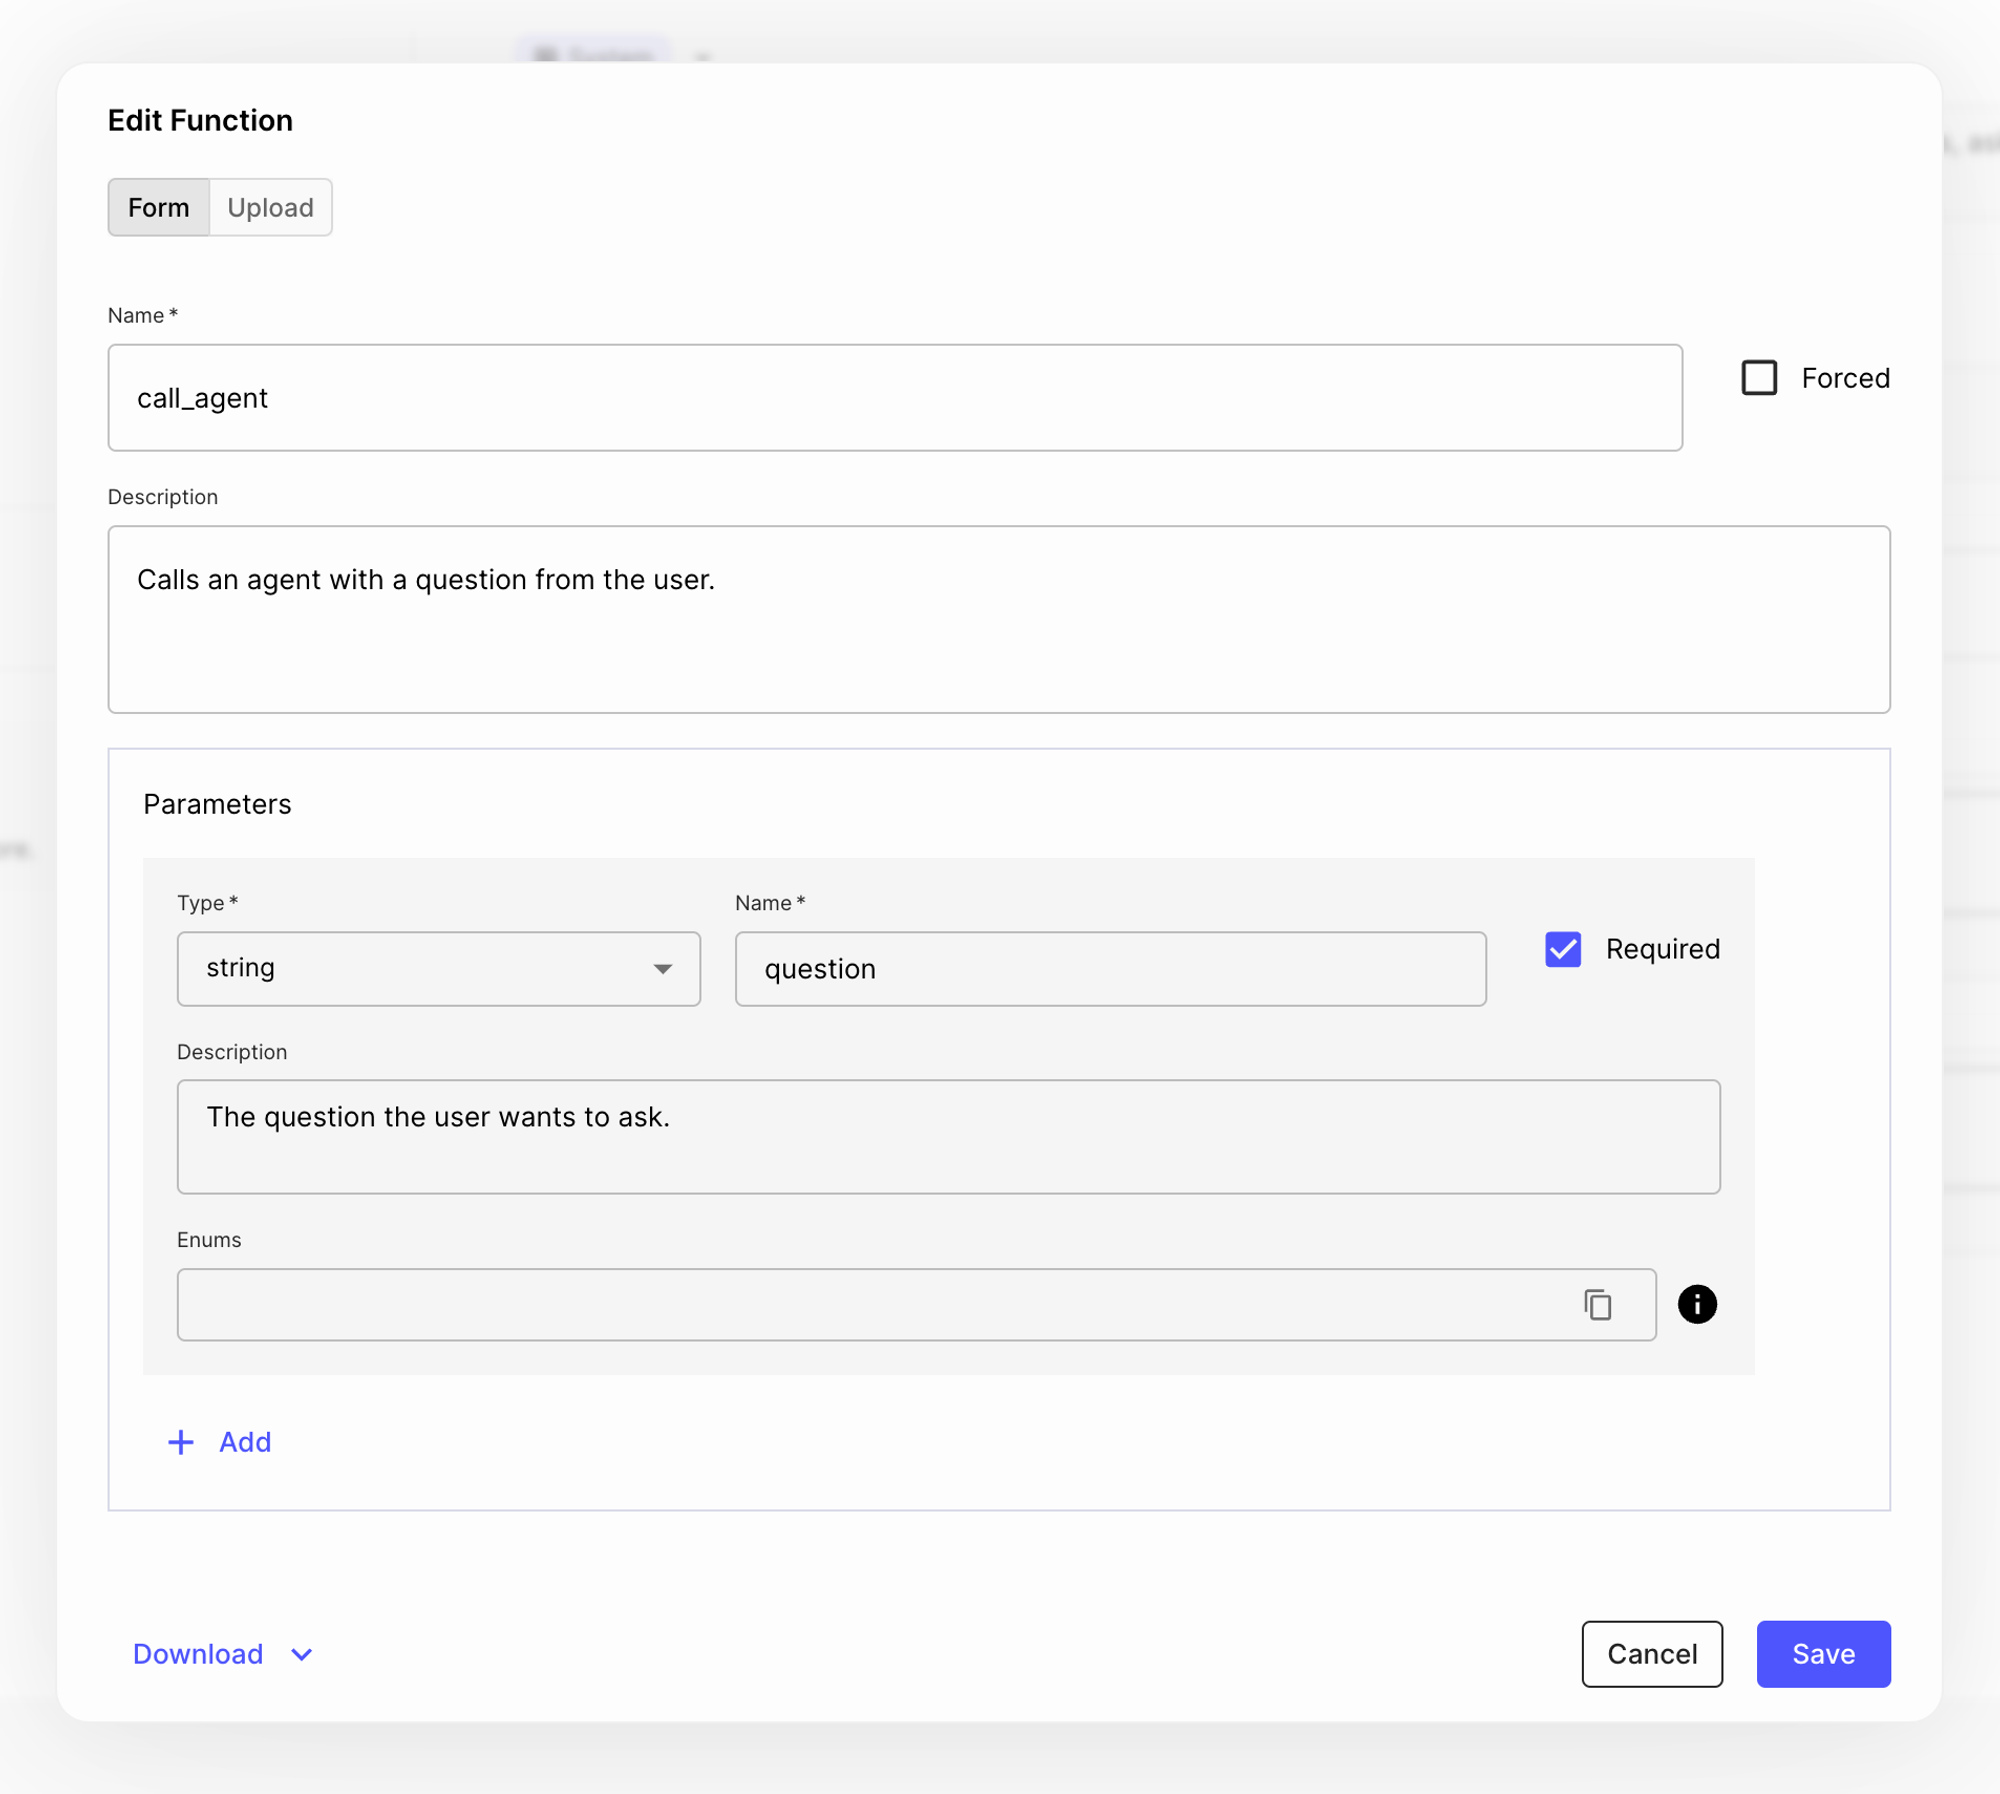
Now let’s create the other Function block call_agent. Using the same process as earlier, we add this function as well, which has one required parameter, “question” which is the user’s query:
Now that we defined everything, our setup looks like this:
💡 With this setup, our OpenAI API calls will take into account the system and user message, the chat history, and two function calling messages to generate responses to a given user query.
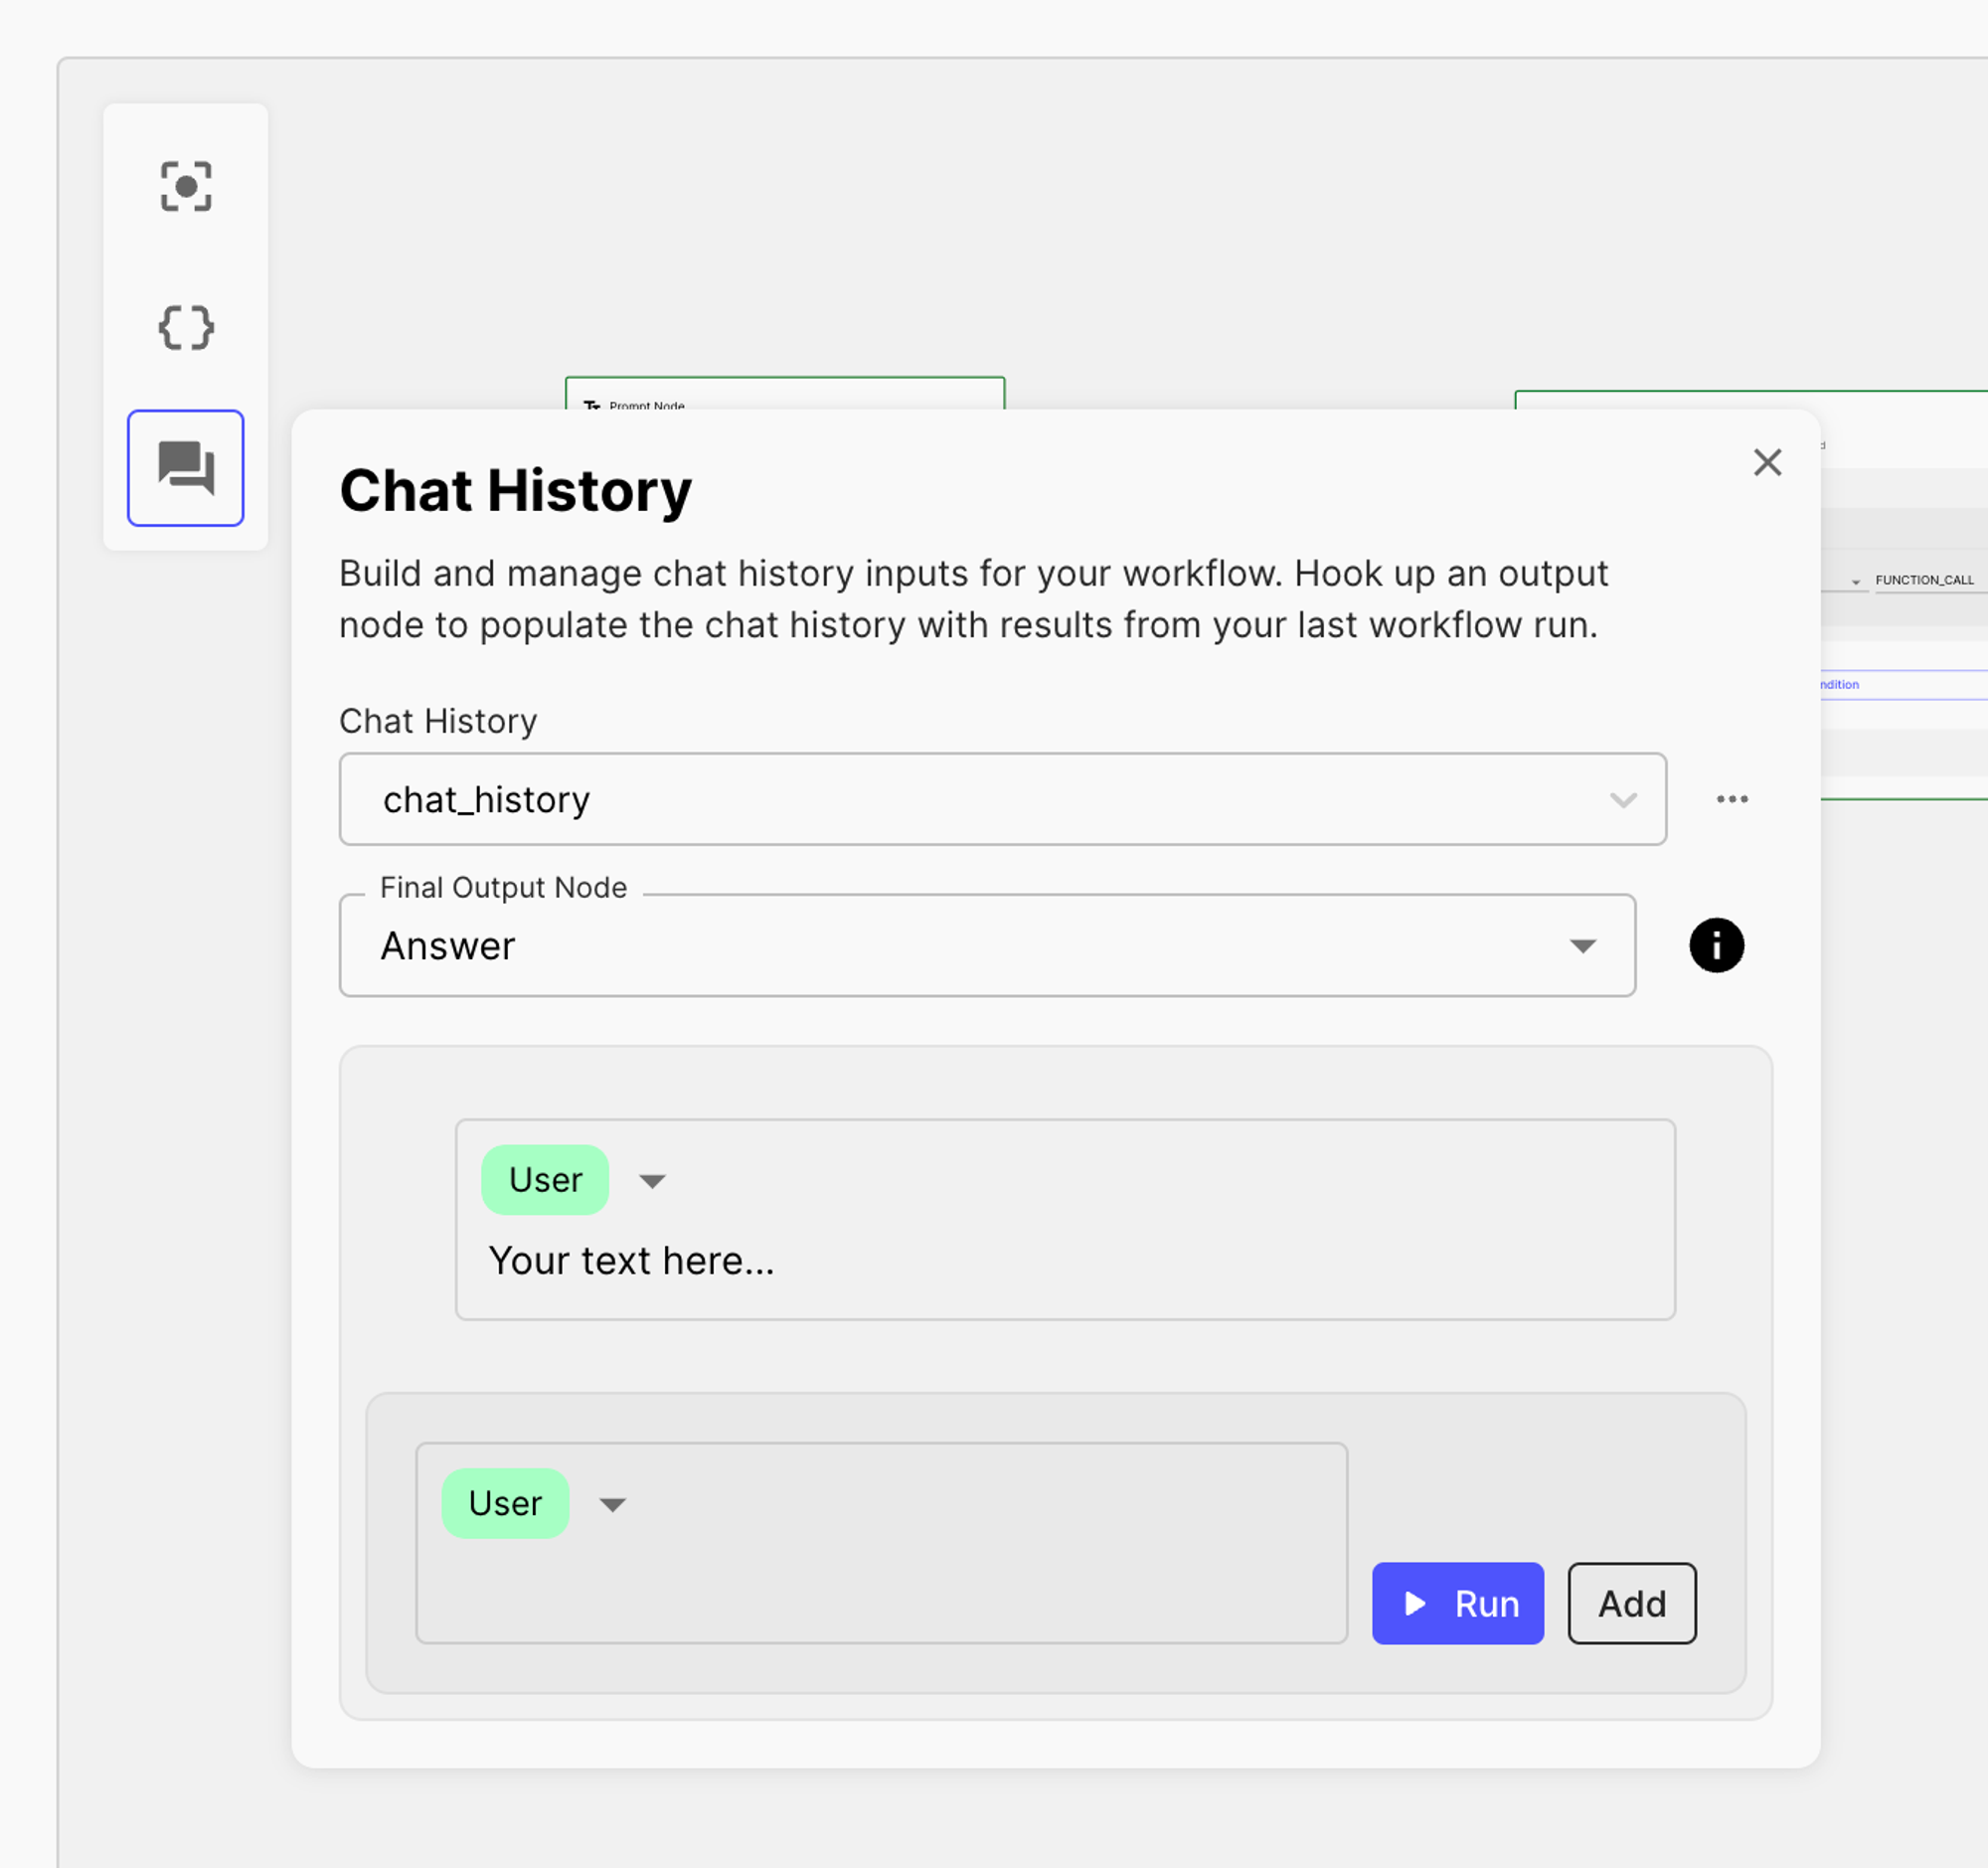
Step 3: Testing the API call
To test the API call, we’ll use the Chat History simulation, where you can run user-assistant messages. You can find this option in the top-left corner of your Workflow sandbox:
Testing the delivery_data function
In the image below, you’ll notice that the model recognizes the user’s inquiry about delivery options for a particular mobile phone. Consequently, it prompts the user for the other required parameters, “location,” & “condition”.
This corresponds to the function call we defined earlier: delivery_data, and the model successfully determined which function to call for this request:
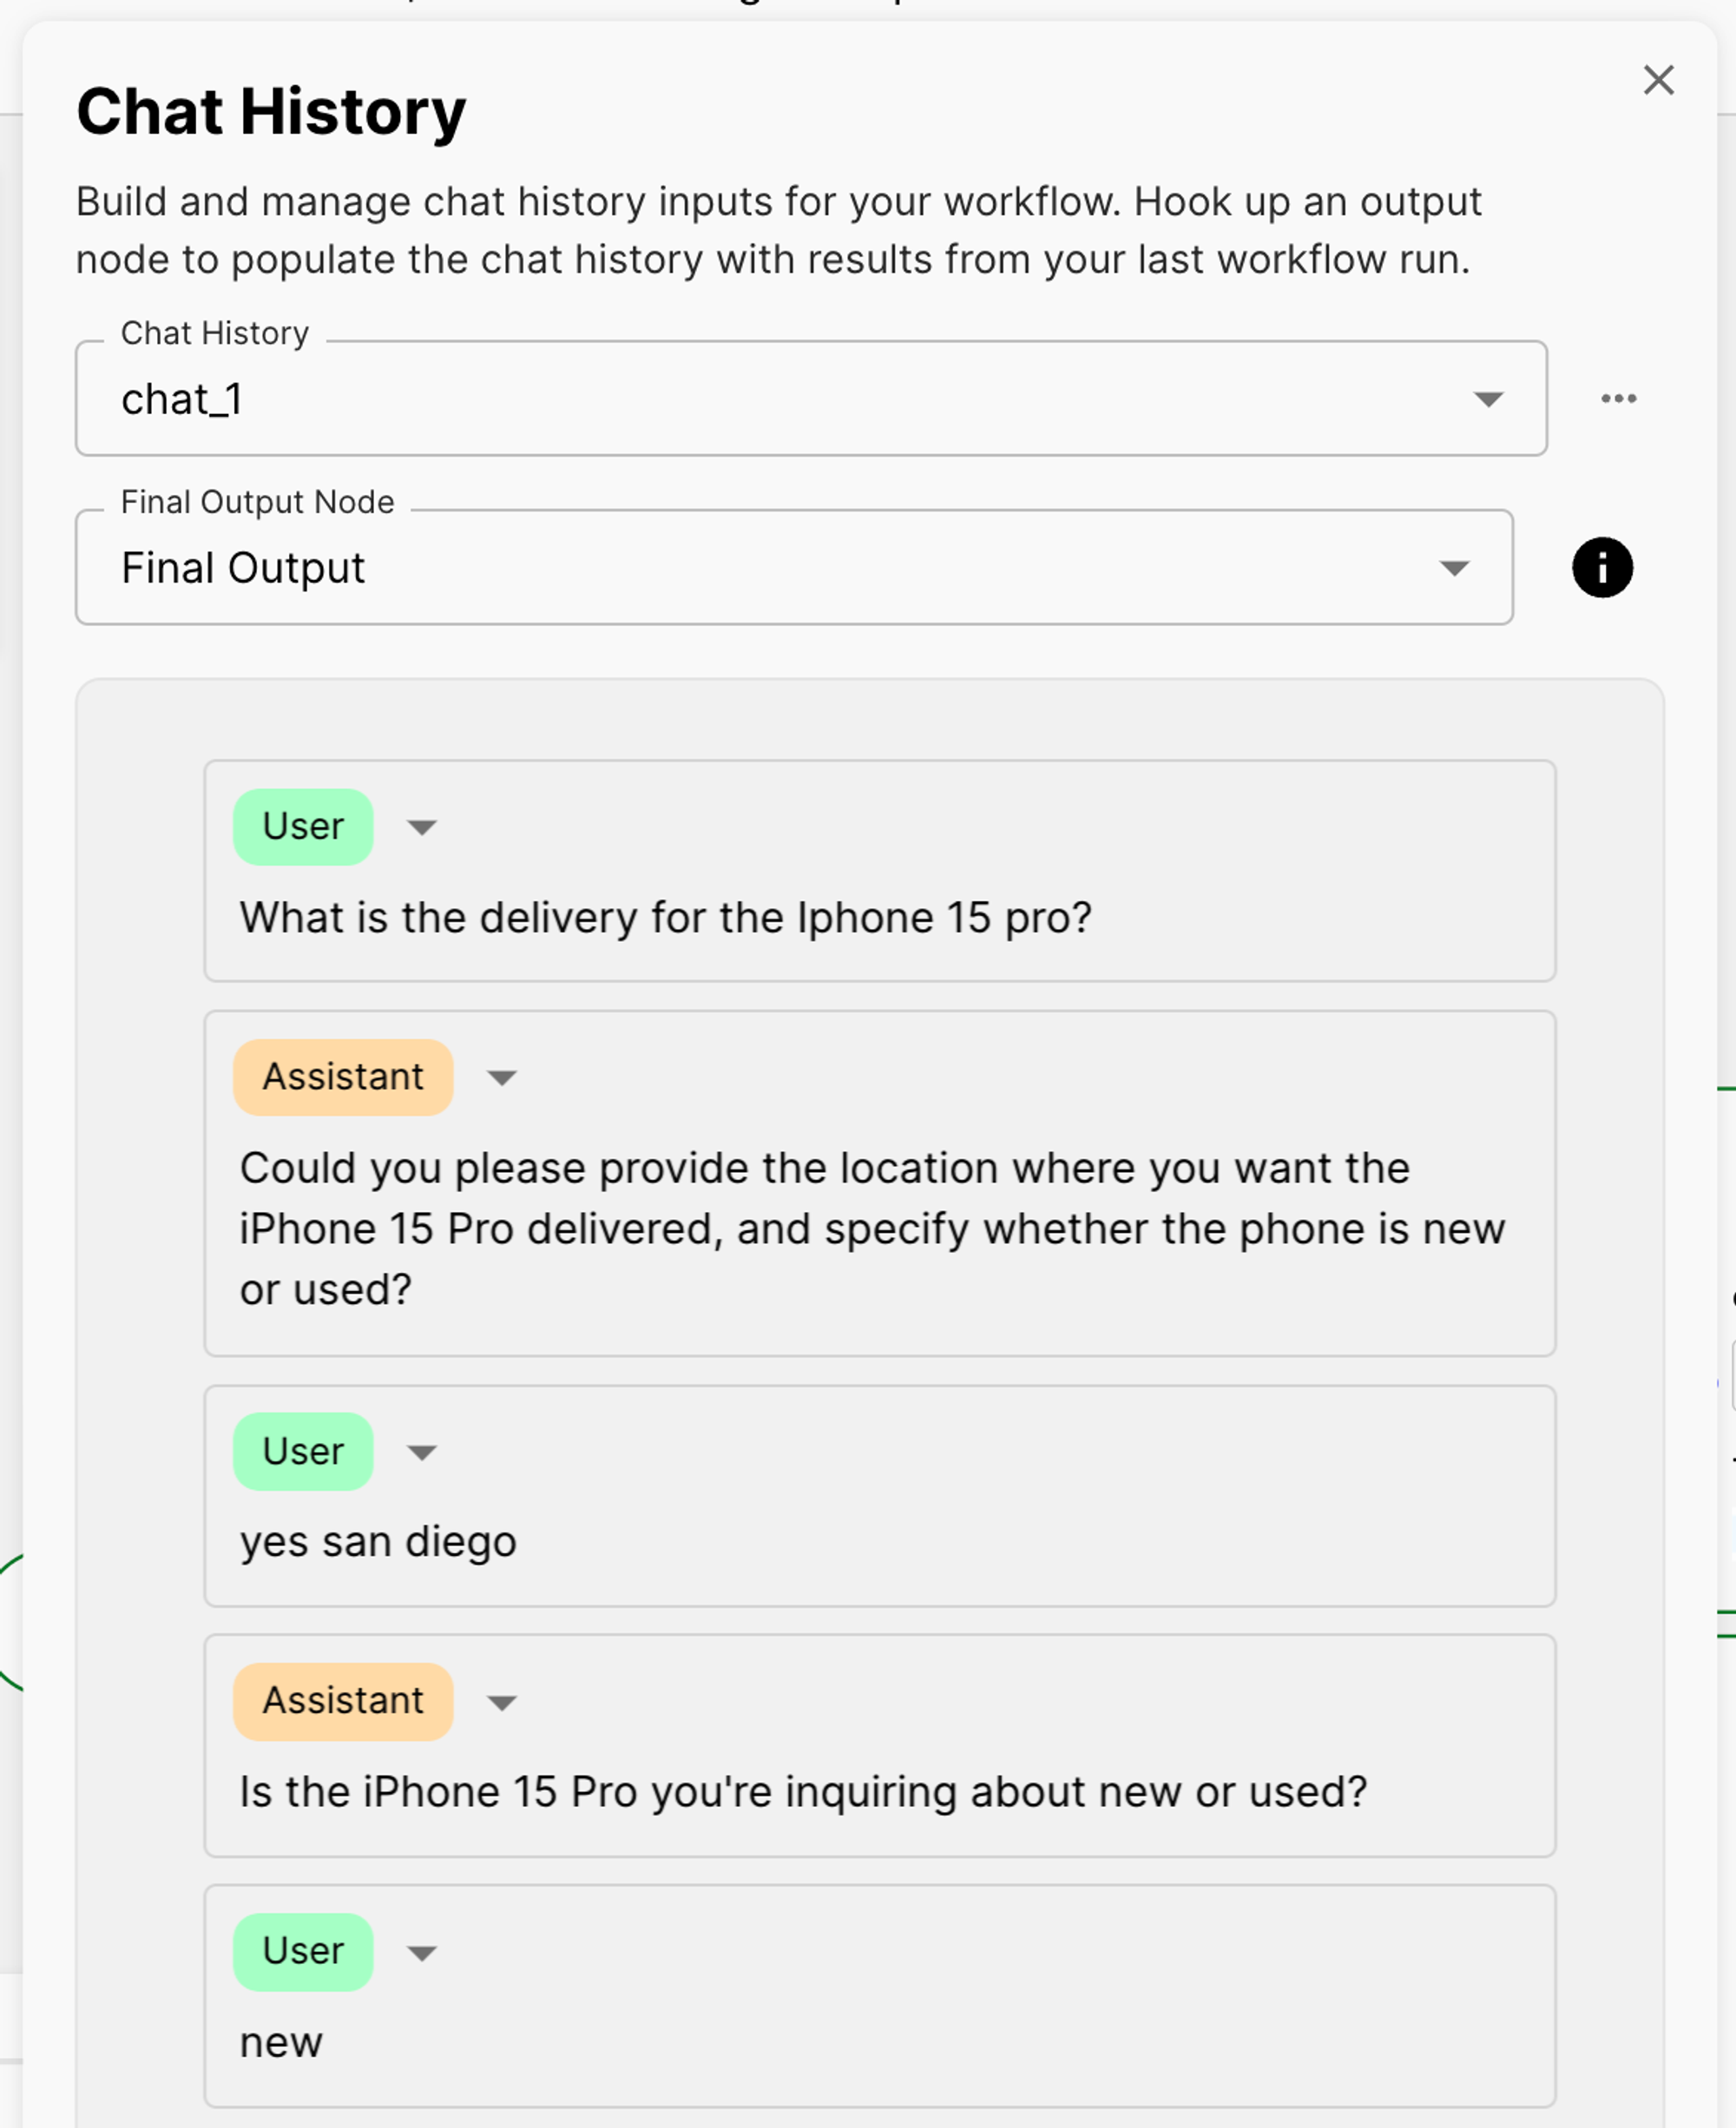
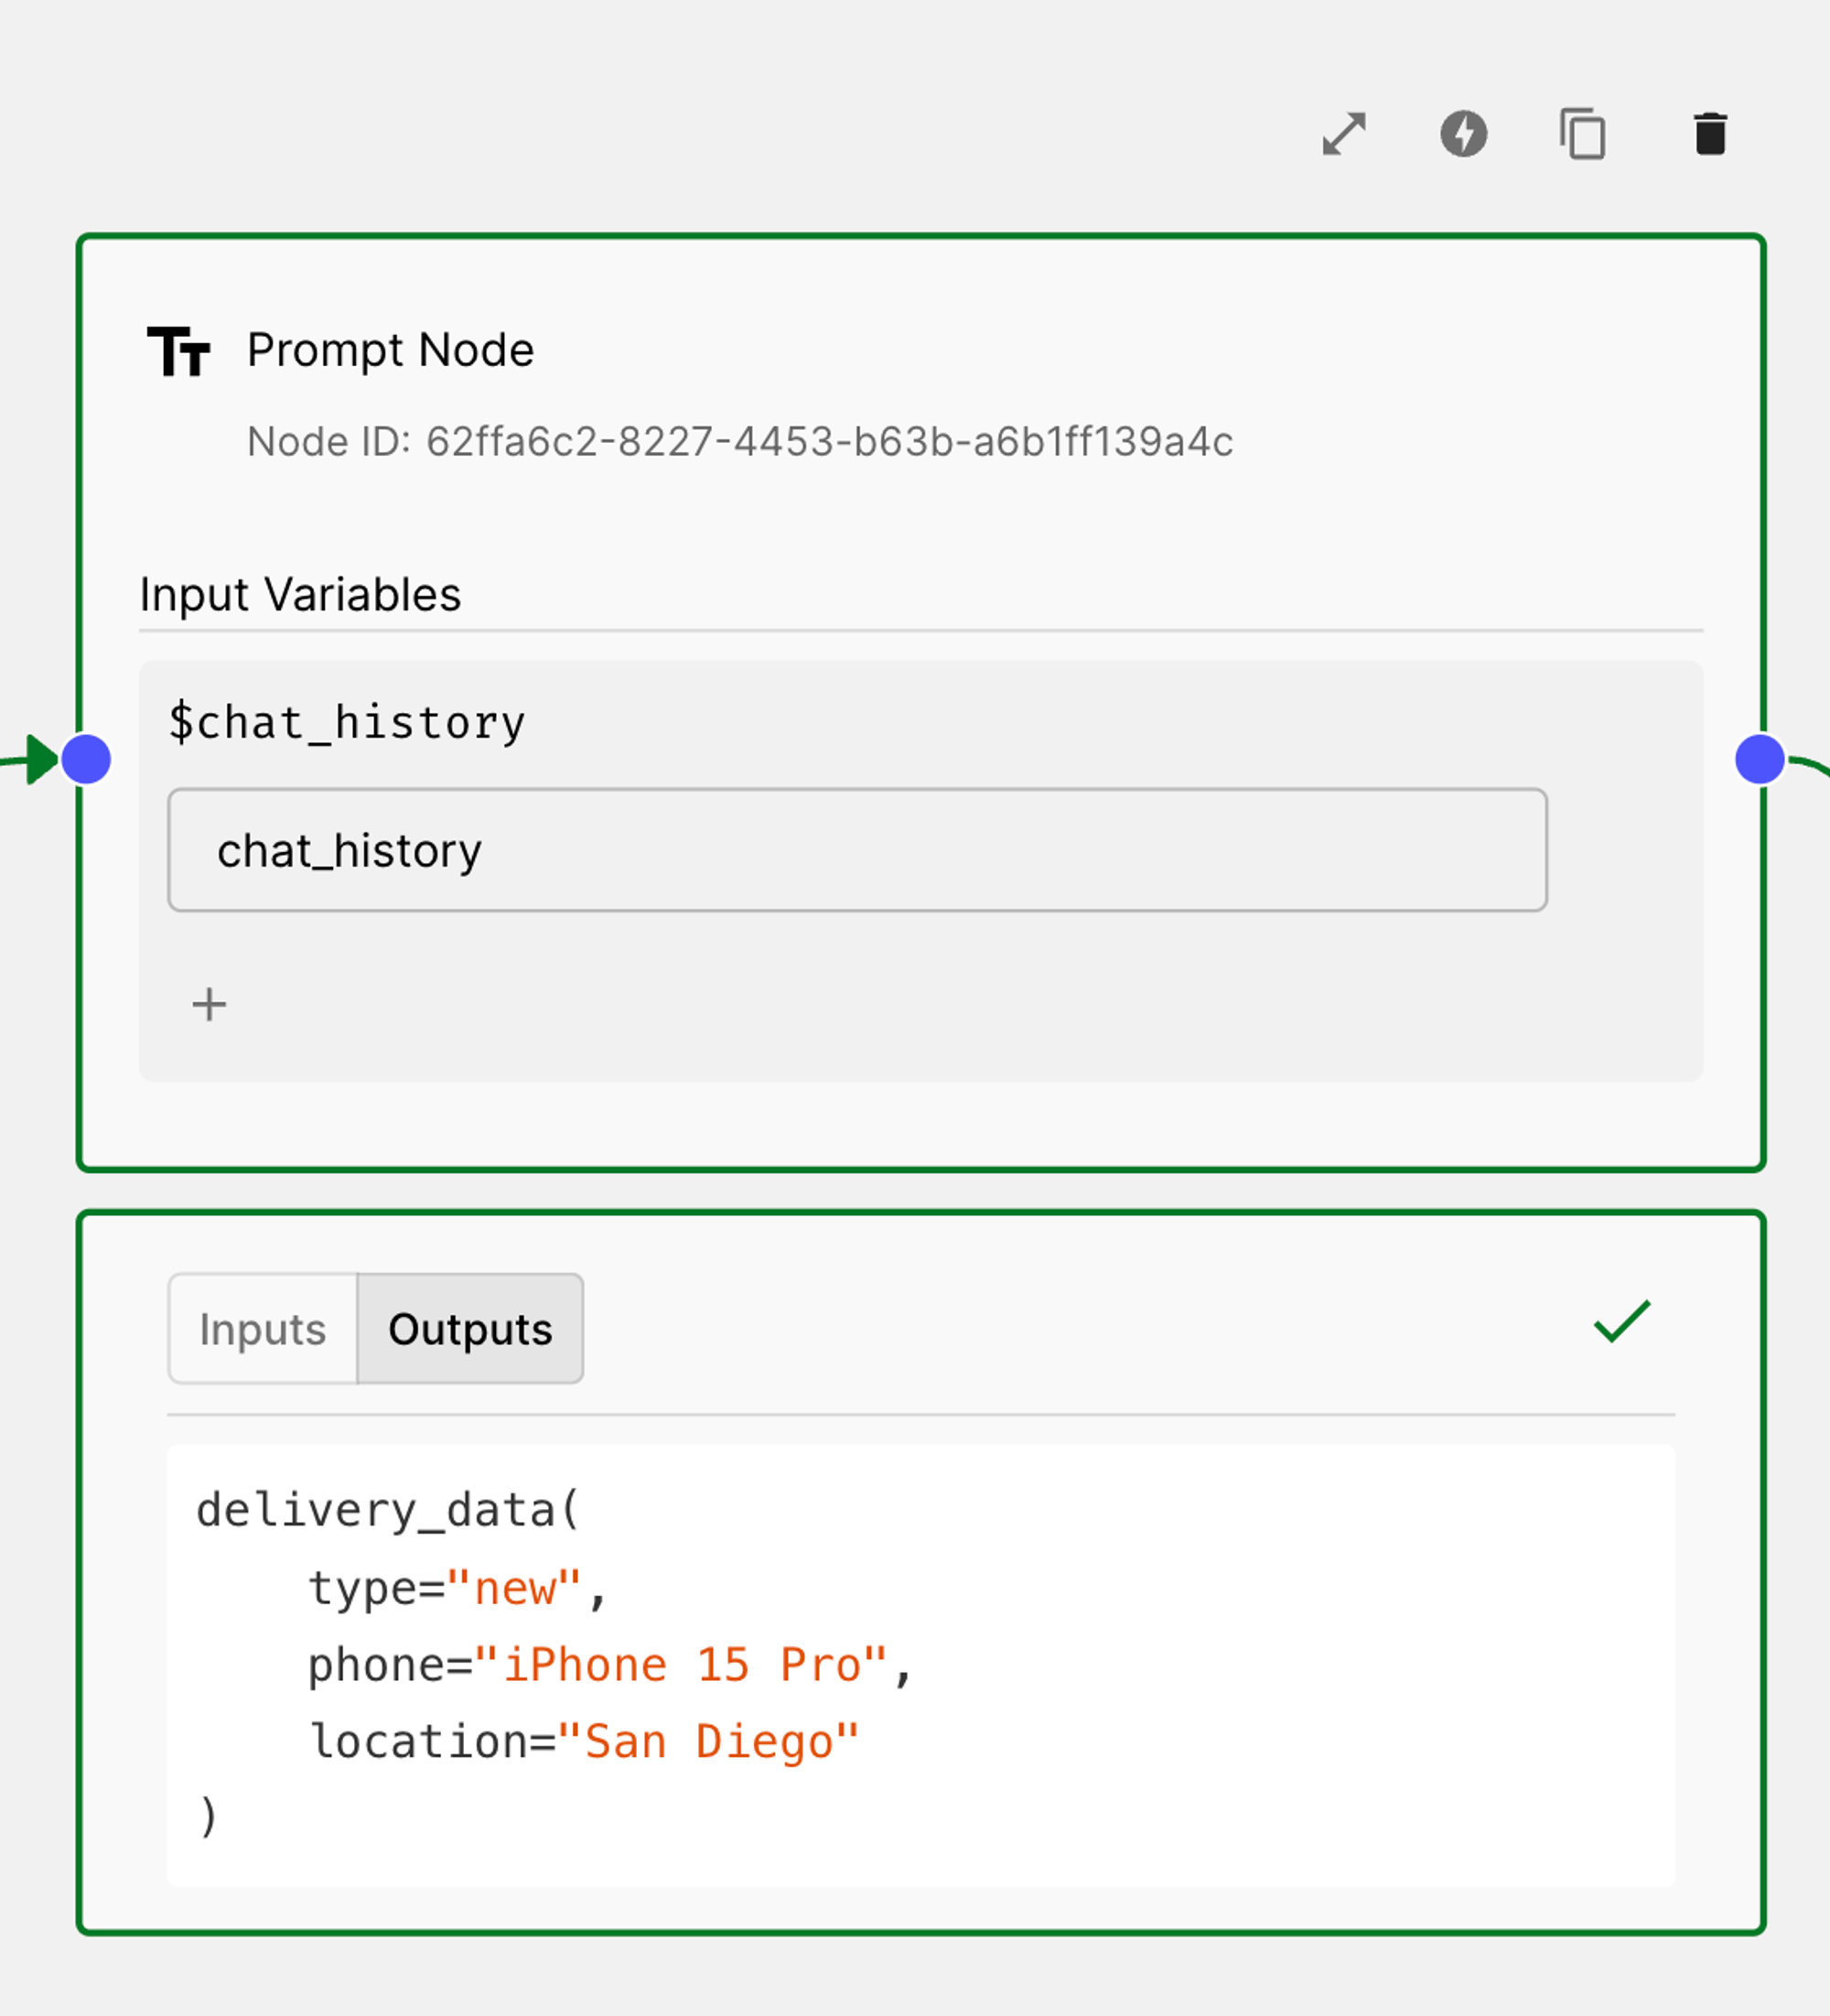
After the user provides the missing information, the model then proceeds to generate the JSON object with the function parameters. Below, you can see that the model successfully gathered all required parameters and displayed them in the output of the Prompt Node:
Next, you’ll probably want to pass these values directly to your code. Let’s learn how to do that in the next section.
Step 4: Pass standardized Function Call outputs to your code
To ensure consistent output across different models, you can use Vellum’s standardized Function Call output type.
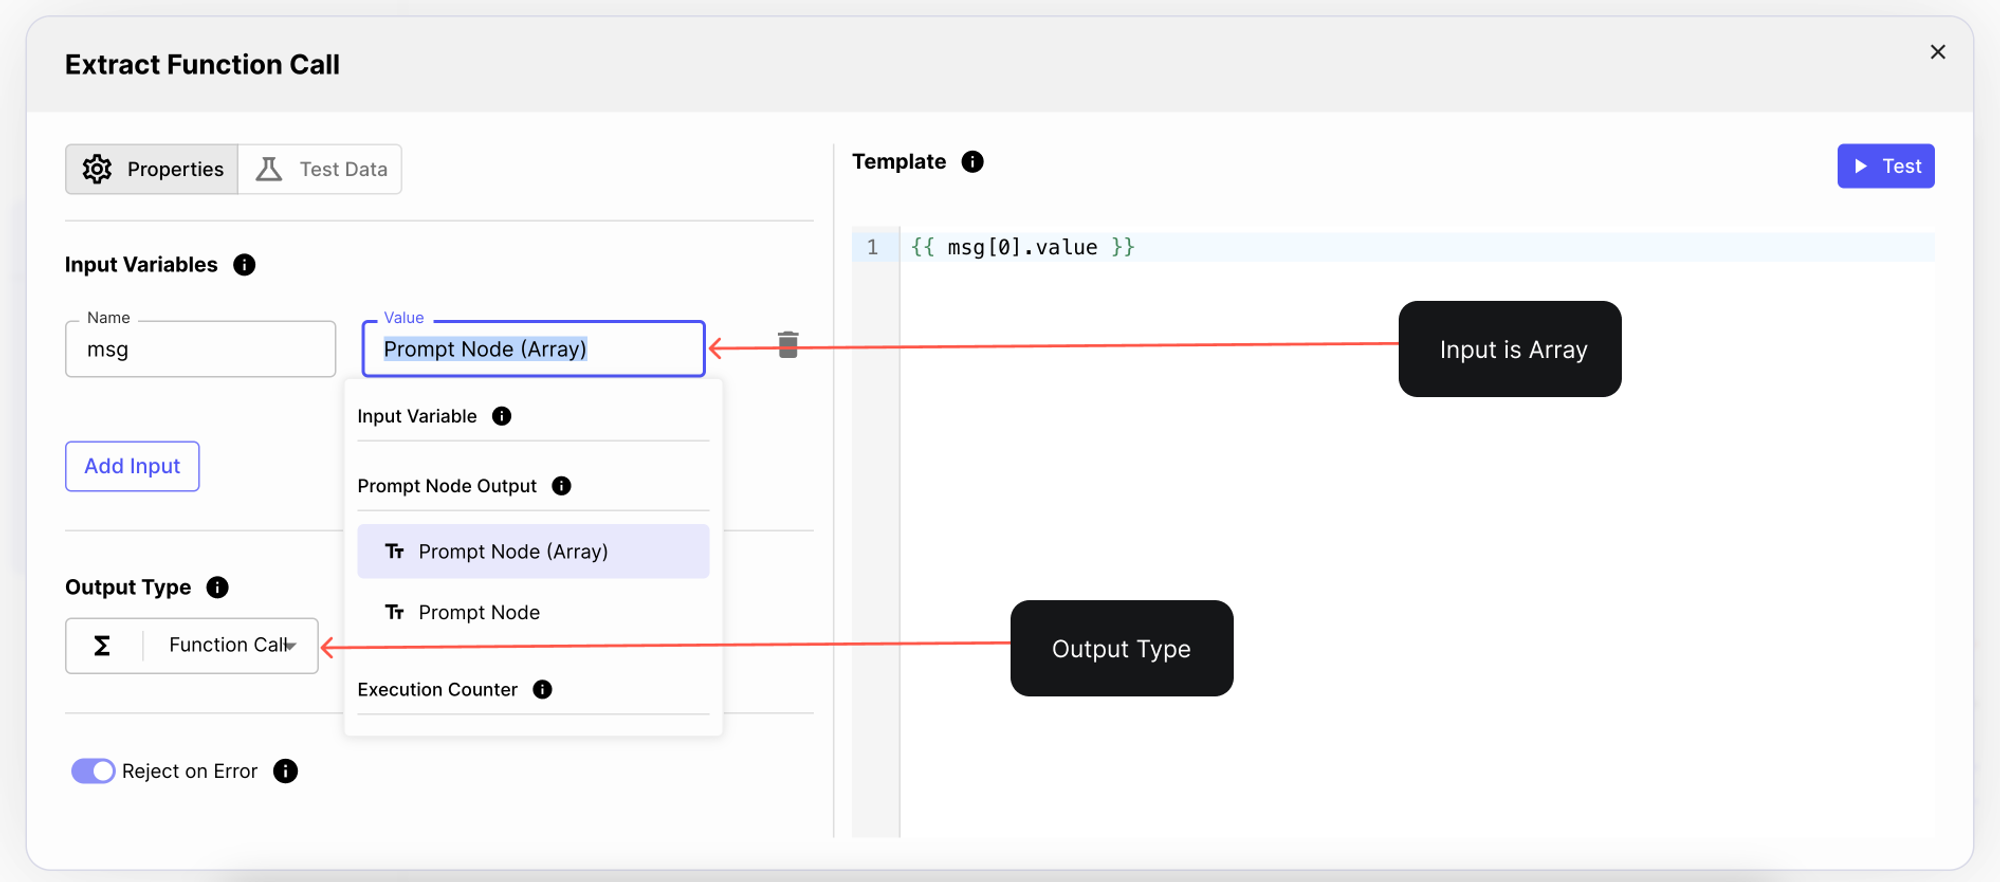
To do this, you need to add a Templating Node that receives all model outputs, and extracts a specific one.
In our case, we add a Templating Node, where we extract the Prompt Node’s outputs as an Array, and we set the output type to be a Function Call:
Finally, you can add a Final Output node to pass the function call into your code.
Here’s what the final Workflow looks like:
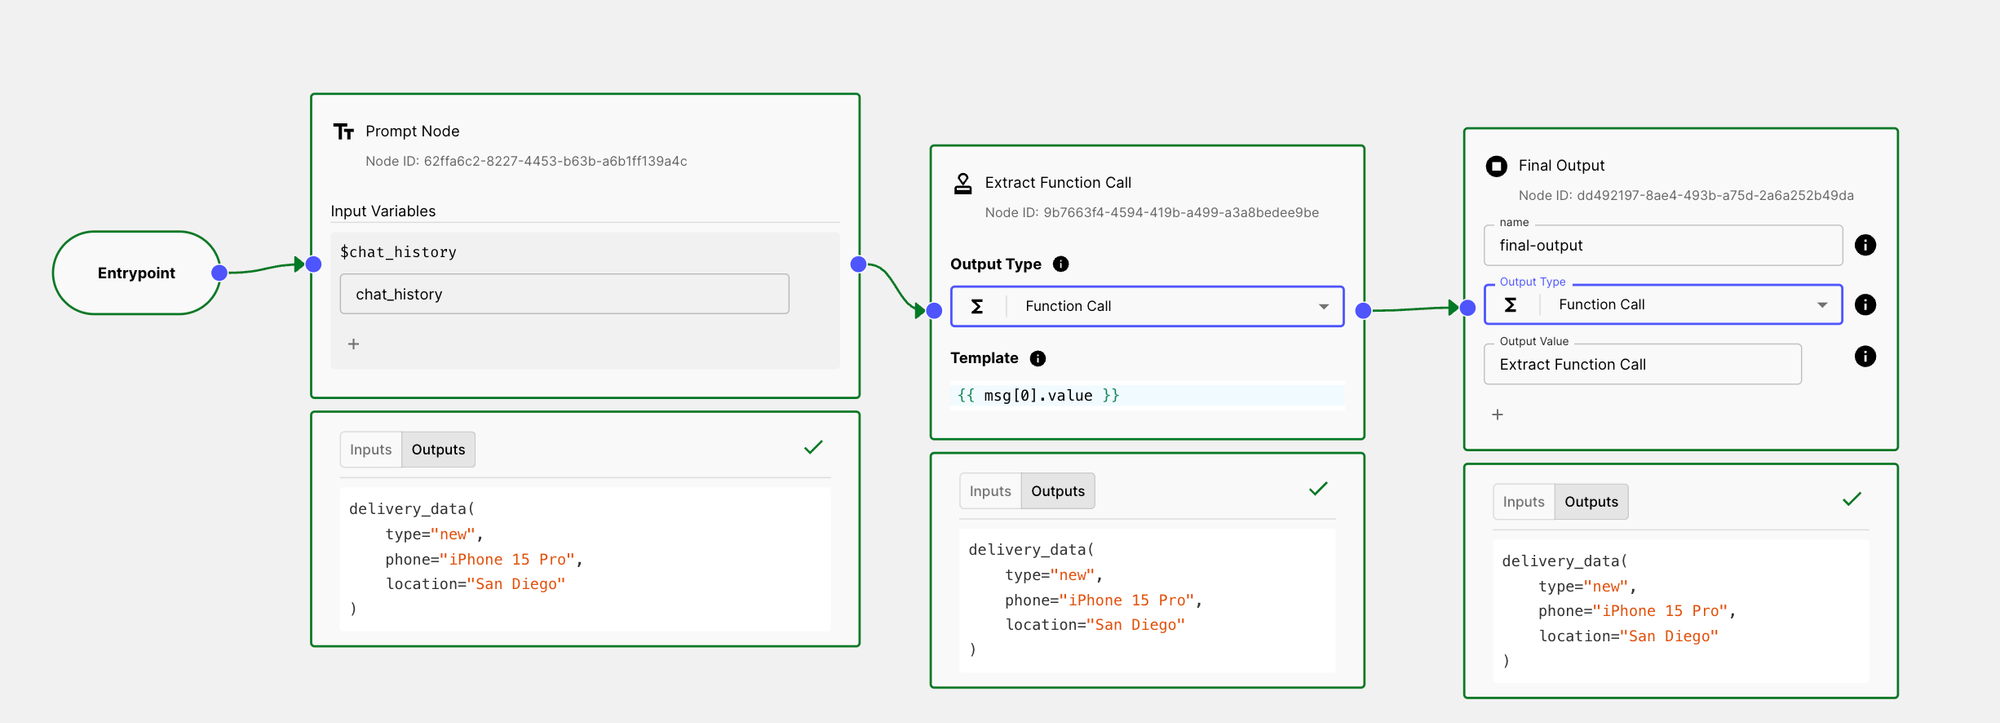
And here’s the raw format from the Final Output node:
This is beneficial if you want your Workflow to exclusively produce function call responses. But in real situations, you might have a Workflow that should generate both Assistant and Function call outputs.
Let’s look at how you can conditionally branch out those outputs with Vellum.
Step 4: Branching out Prompt Node Outputs
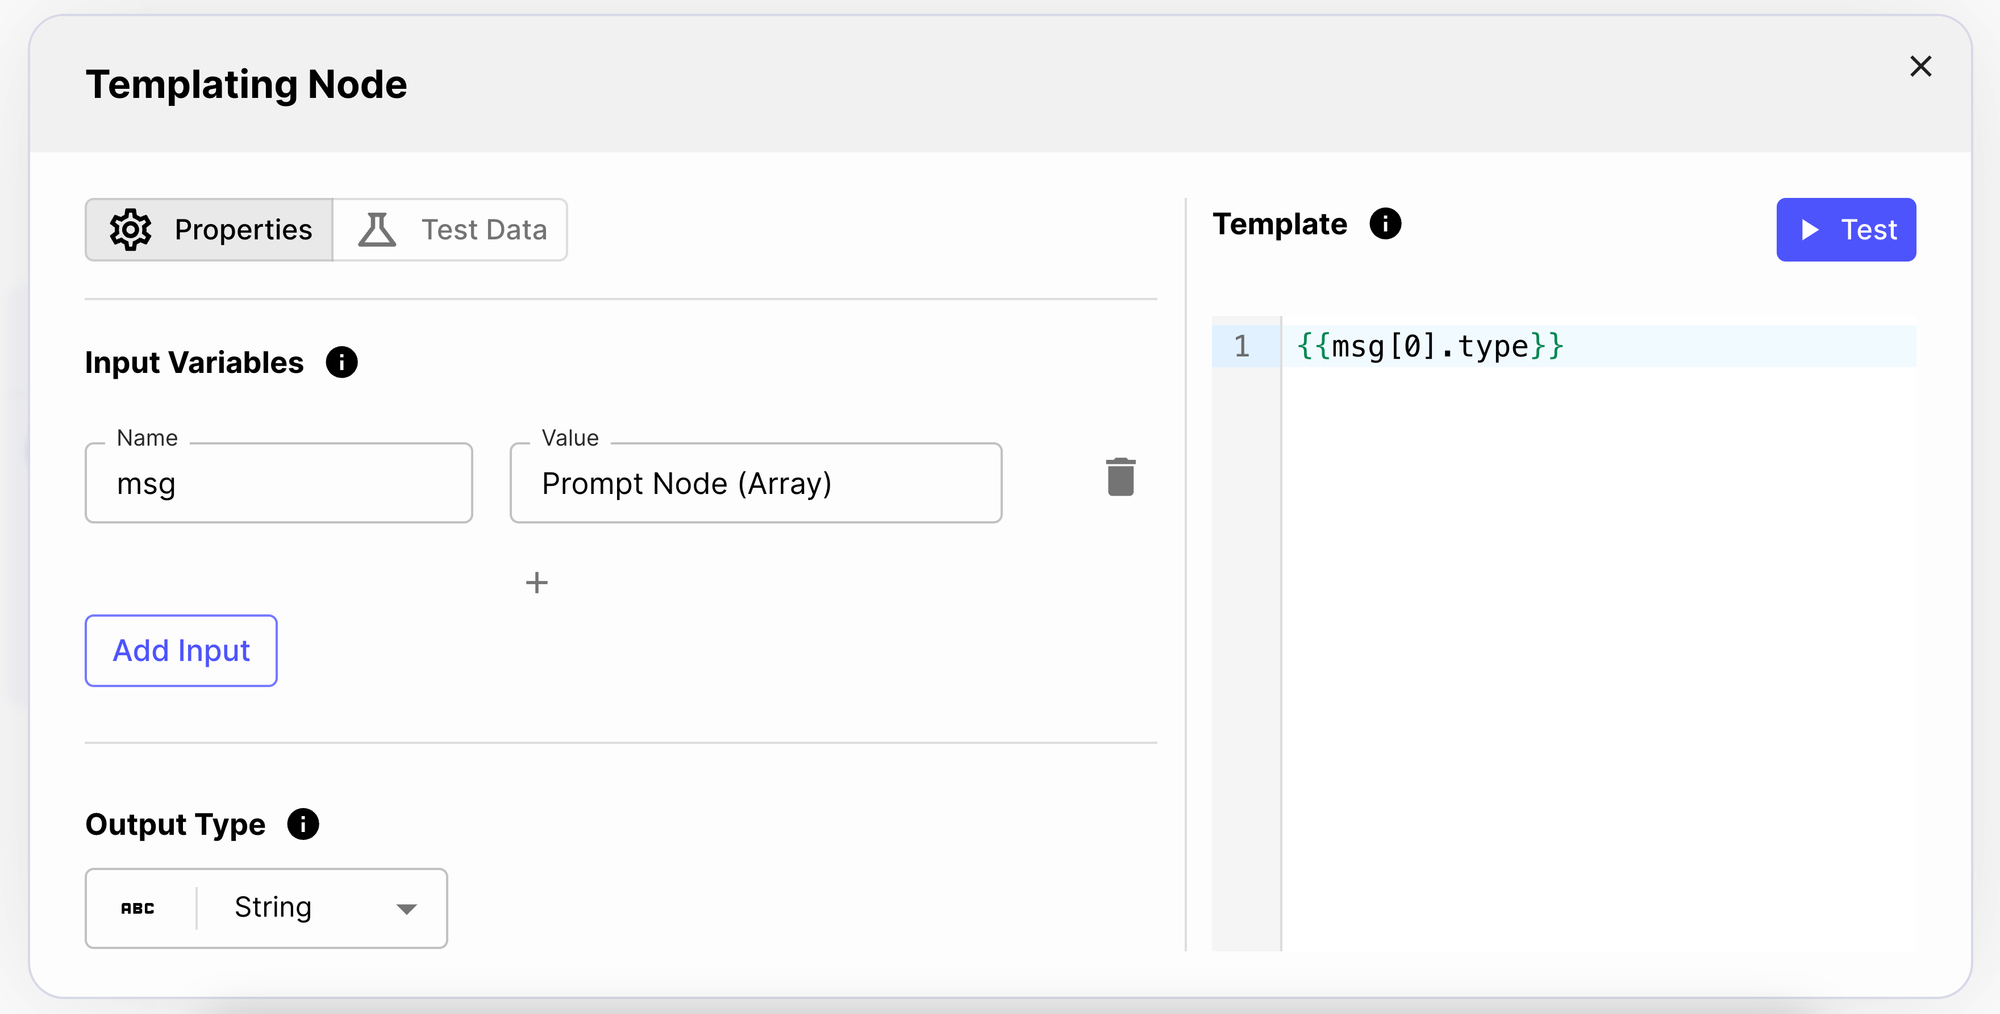
To branch out the model’s responses, you’ll first need to add a Templating Node and extract the output type from the Prompt Node:
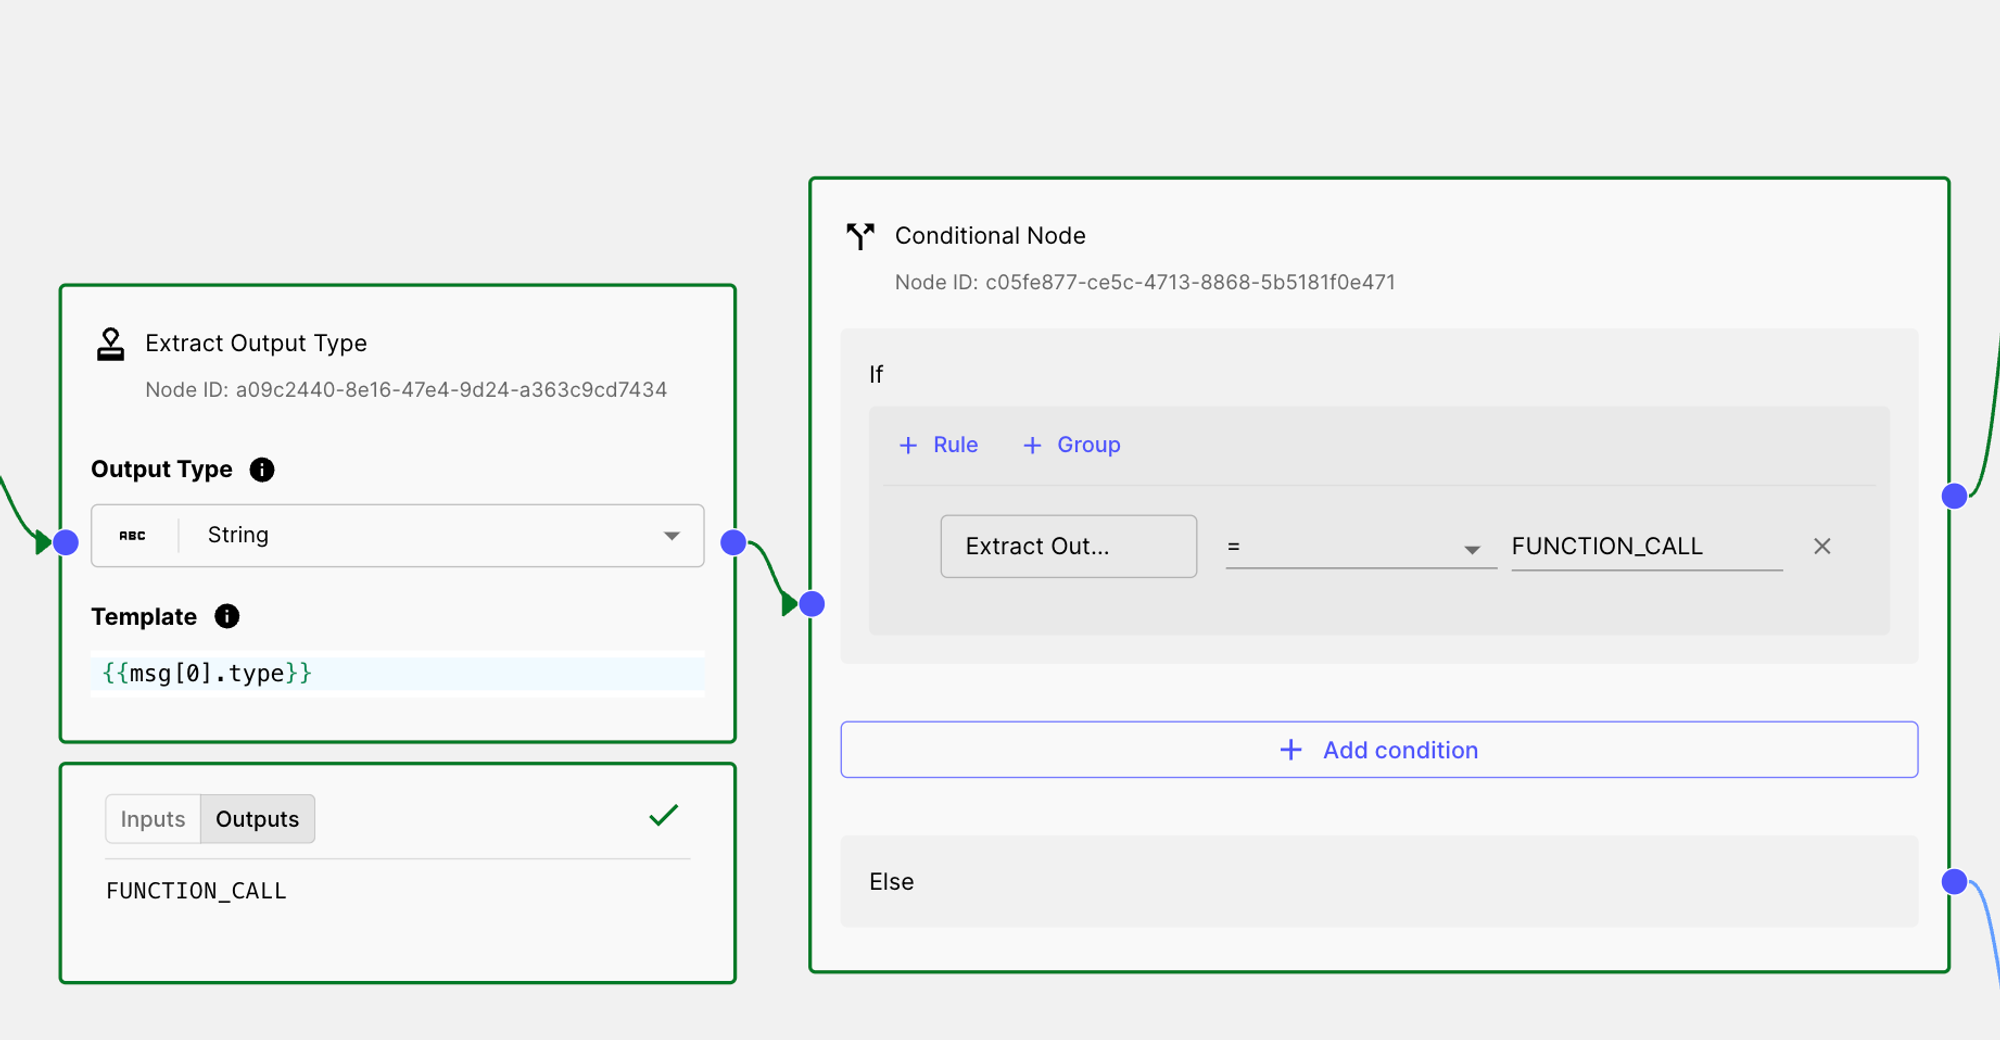
Next, you’ll add a Conditional Node, where you’ll verify if the output type is a FUNCTION_CALL. If it is, you can divert to the function calling flow; otherwise, proceed with the alternative path.
Here’s what the setup should look like:
Finally, we add the Function calling and the alternate path:
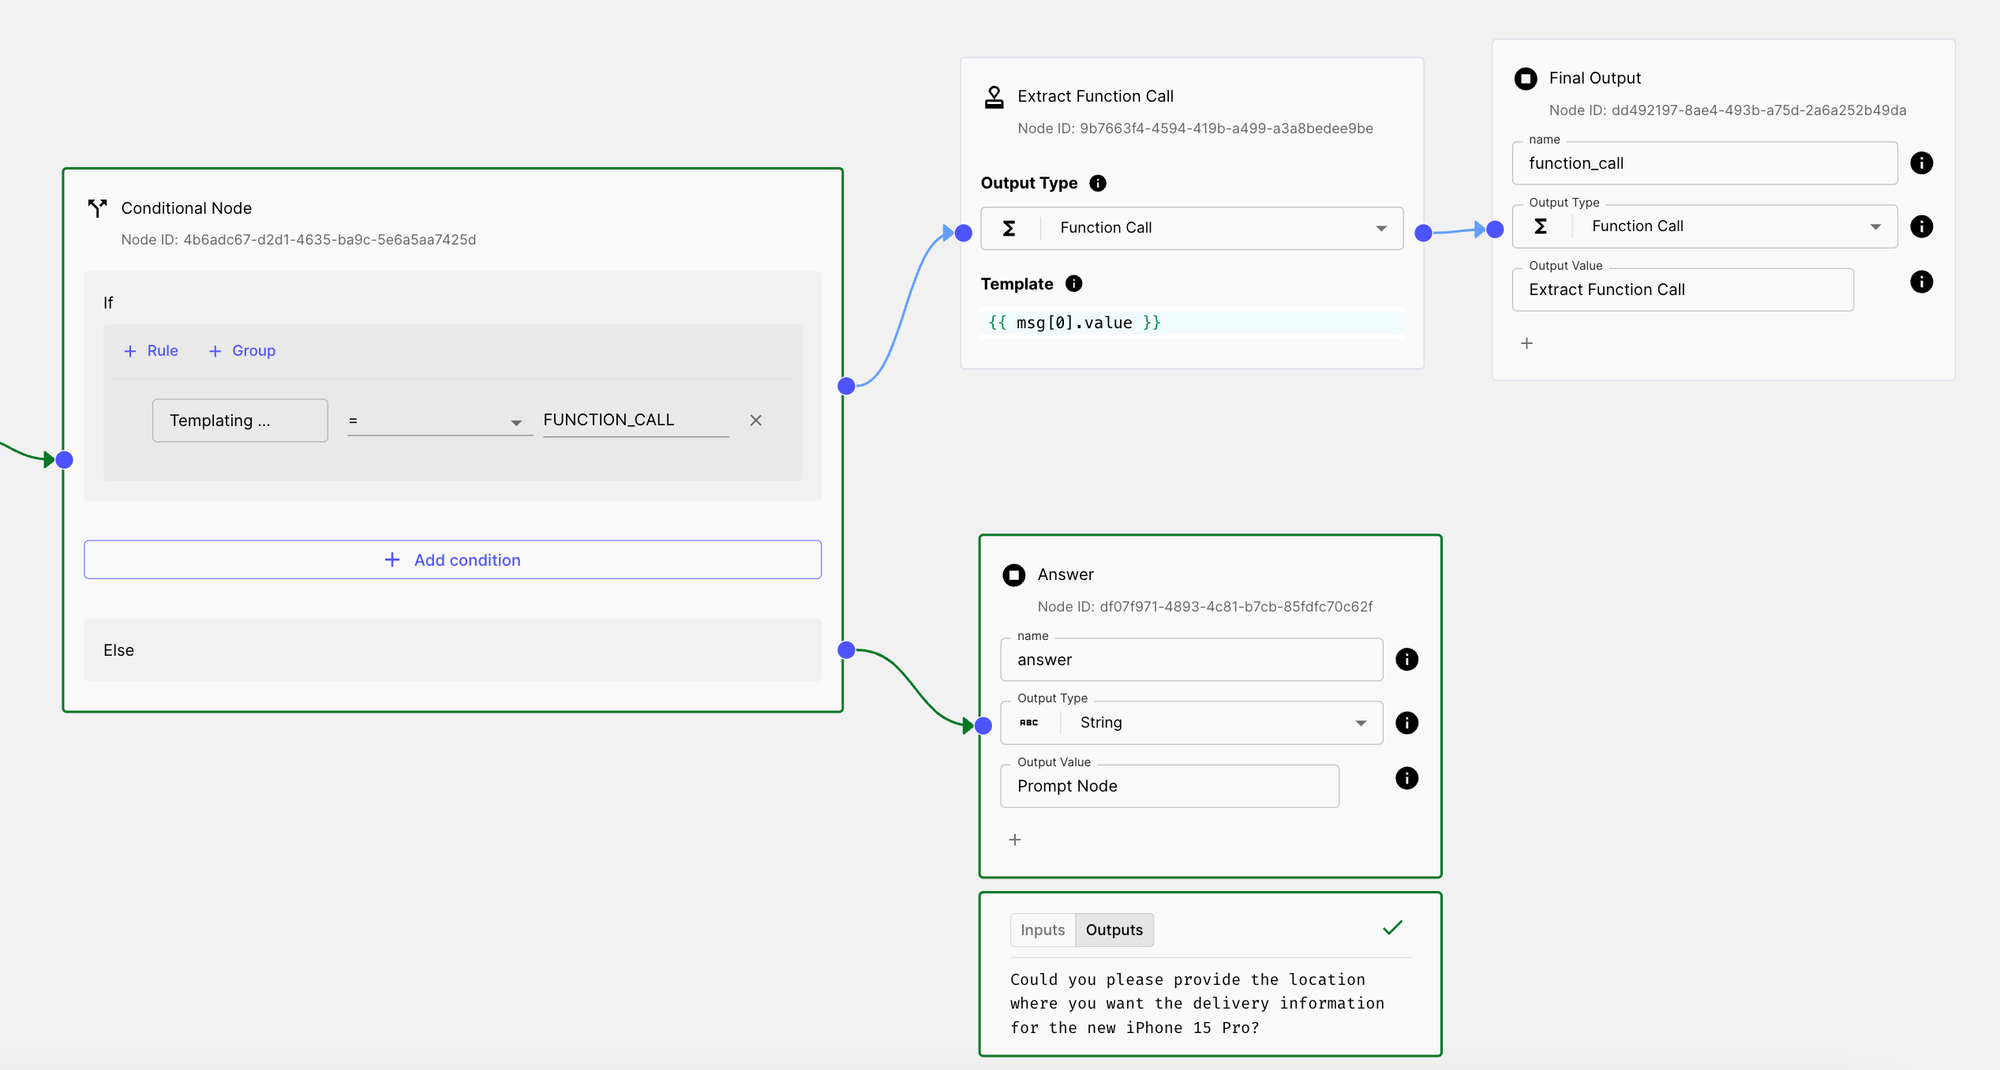
The first path will verify if the model generates a function call message and then pass that value as the final output. The second path will check if the model produces an Assistant message and similarly pass that value as the final output.
Once all of this is connected, we get this Workflow:
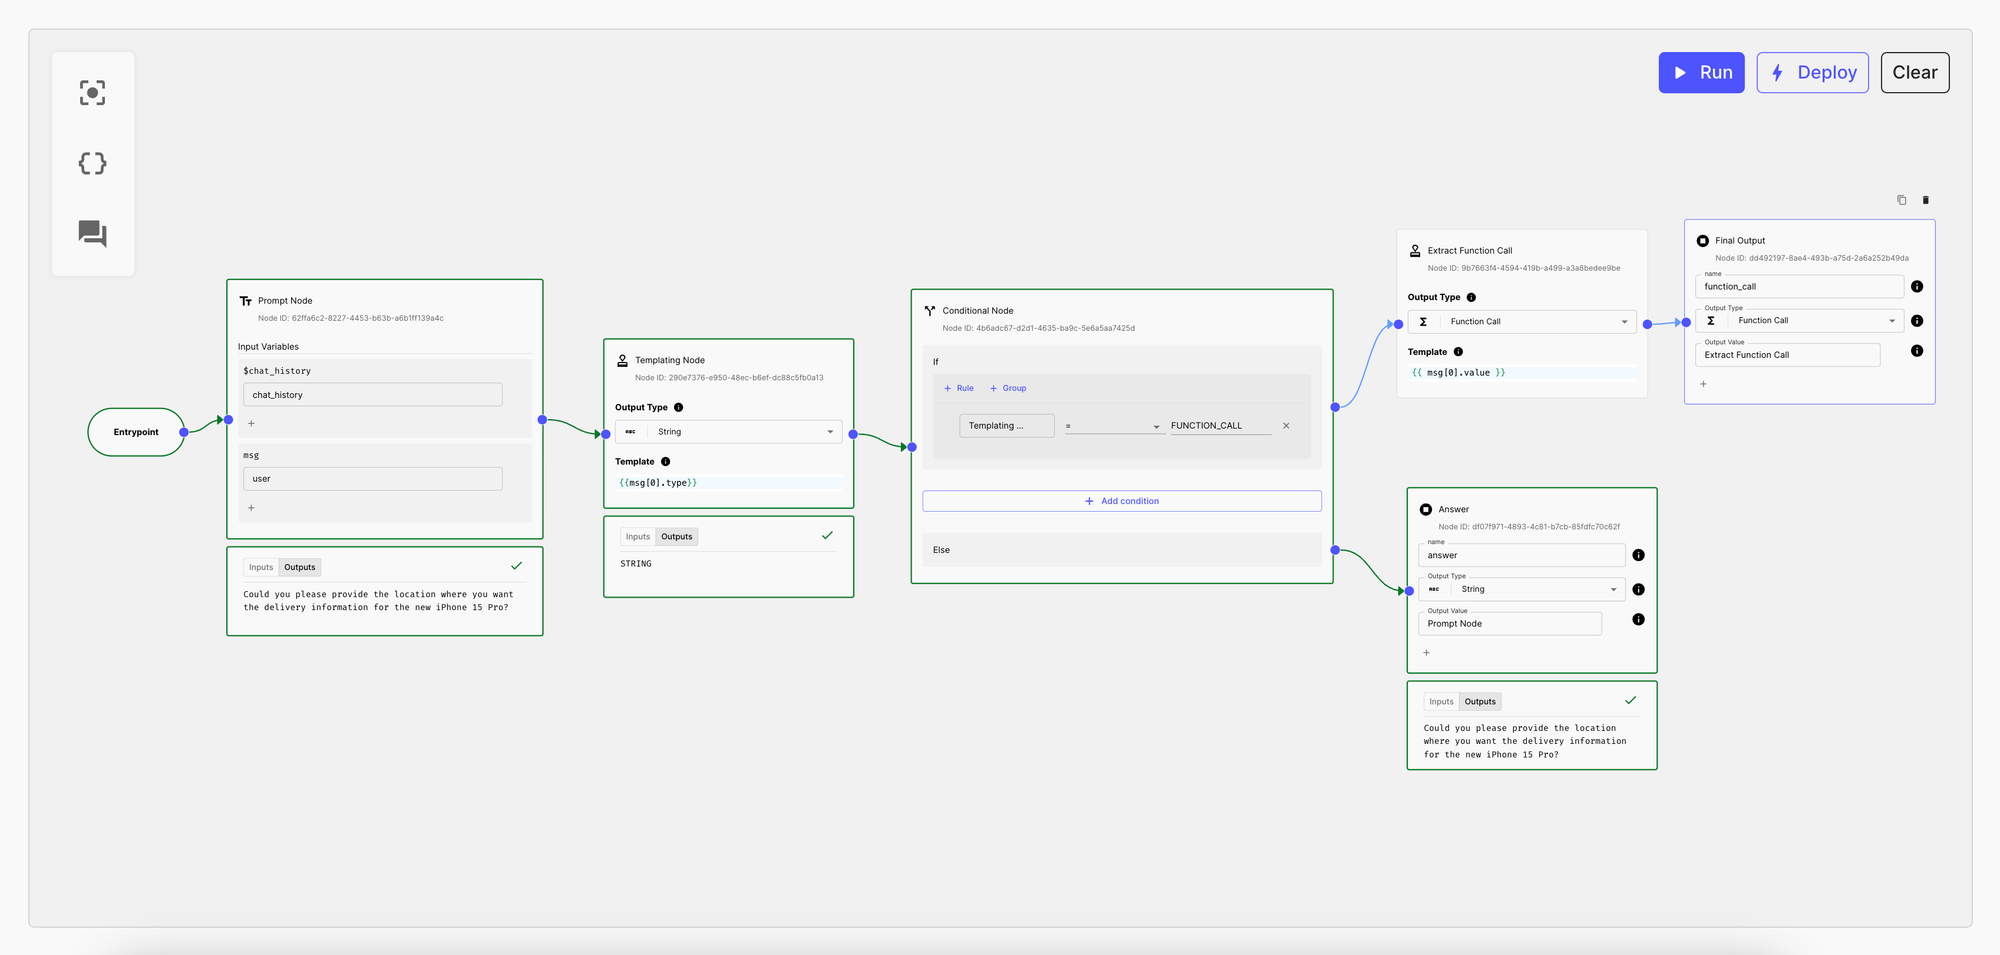
You can now deploy your Workflow in your code.
Once deployed, you’ll need to invoke it using two input variables:
chat_history–CHAT_HISTORYuser–STRING
And the API call will return, two output variables:
function_call–FUNCTION_CALLanswer–STRING
Step 5: Adding arbitrary functions
To showcase how this Workflow works, in our code, we wrote arbitrary functions that will print some static messages once the model passes the required parameters.
For the delivery_data function we’ll retrieve static message:
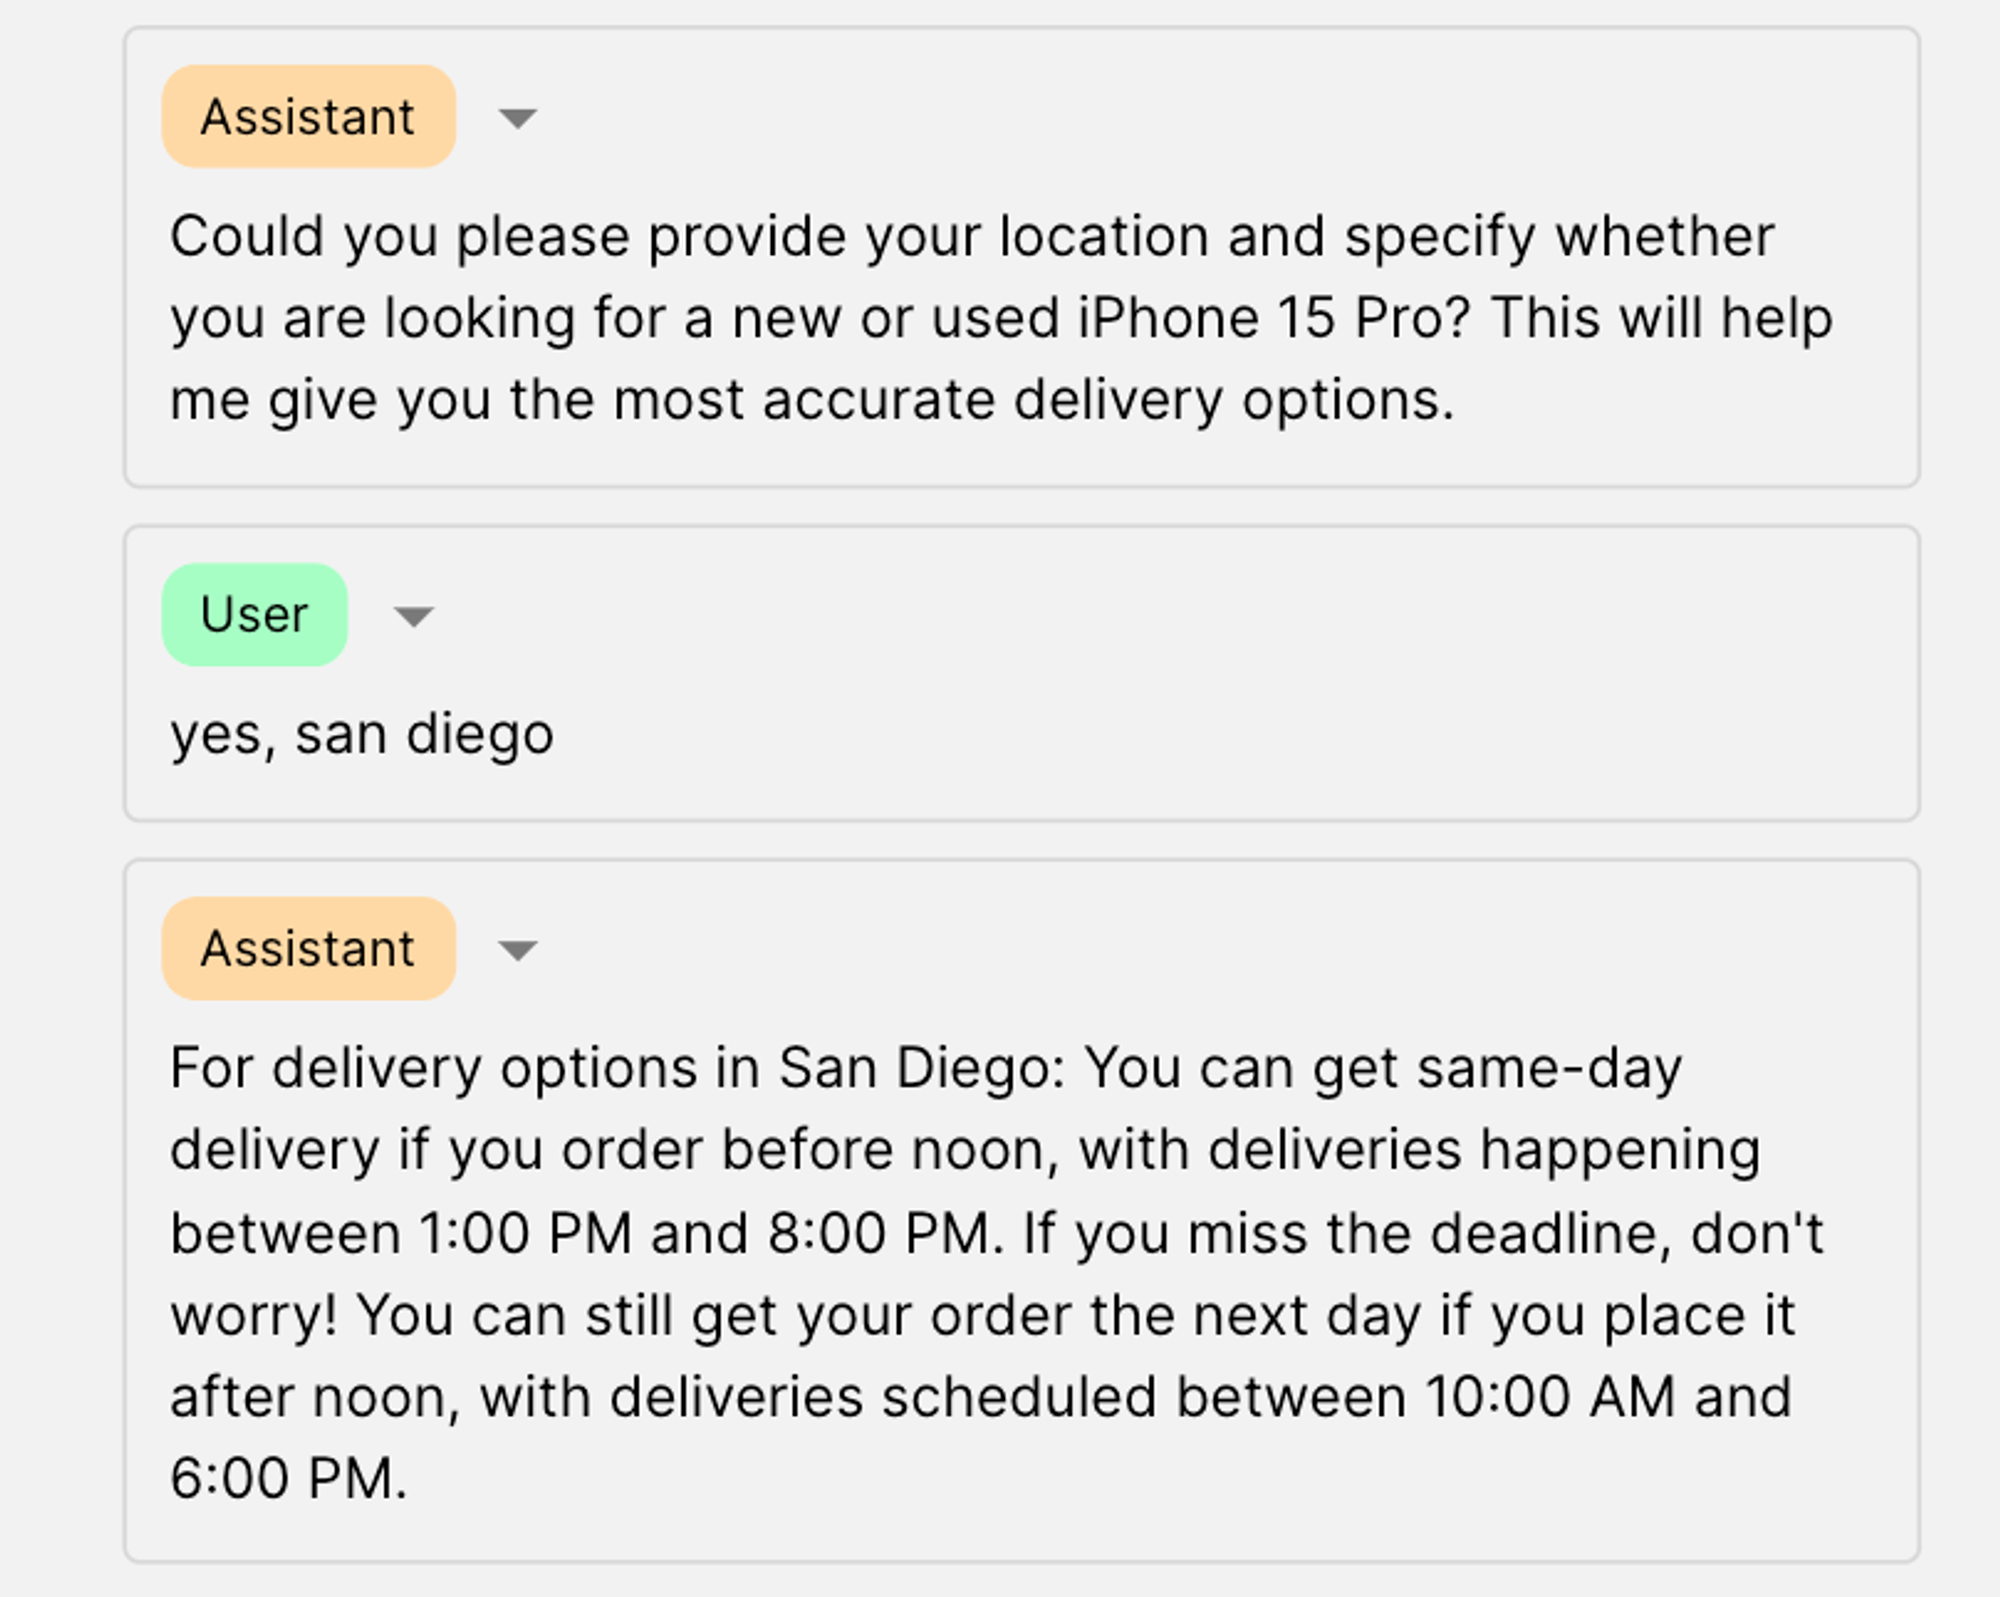
💬 For delivery options in San Diego: You can get same-day delivery if you order before noon, with deliveries happening between 1:00 PM and 8:00 PM. If you miss the deadline, don’t worry! You can still get your order the next day if you place it after noon, with deliveries scheduled between 10:00 AM and 6:00 PM.
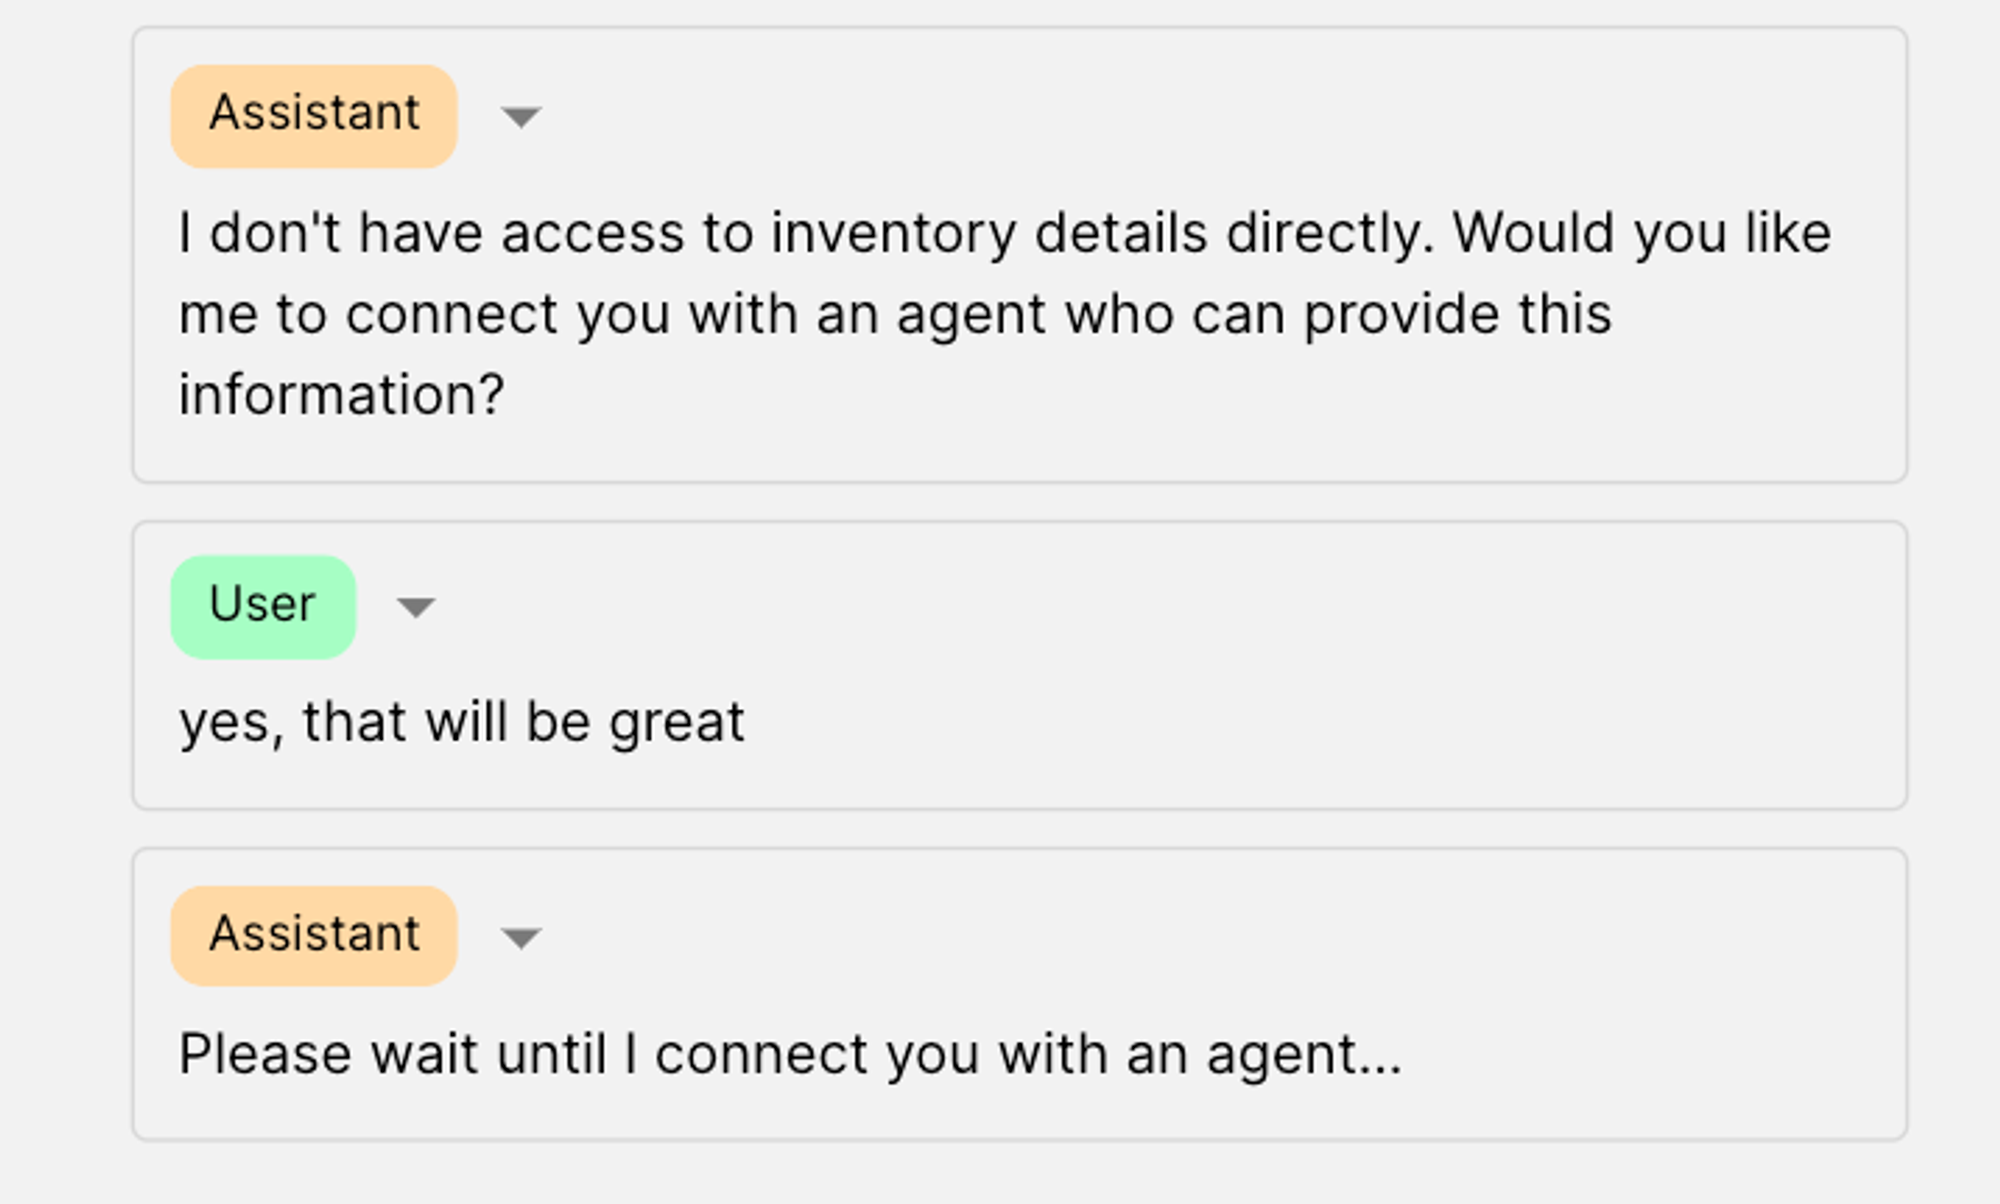
For the call_agent function we send another static message:
💬 Please wait until I connect you with an agent…
This is what our code looks like:
Step 6: Testing the workflow
Now, let’s see how this works!
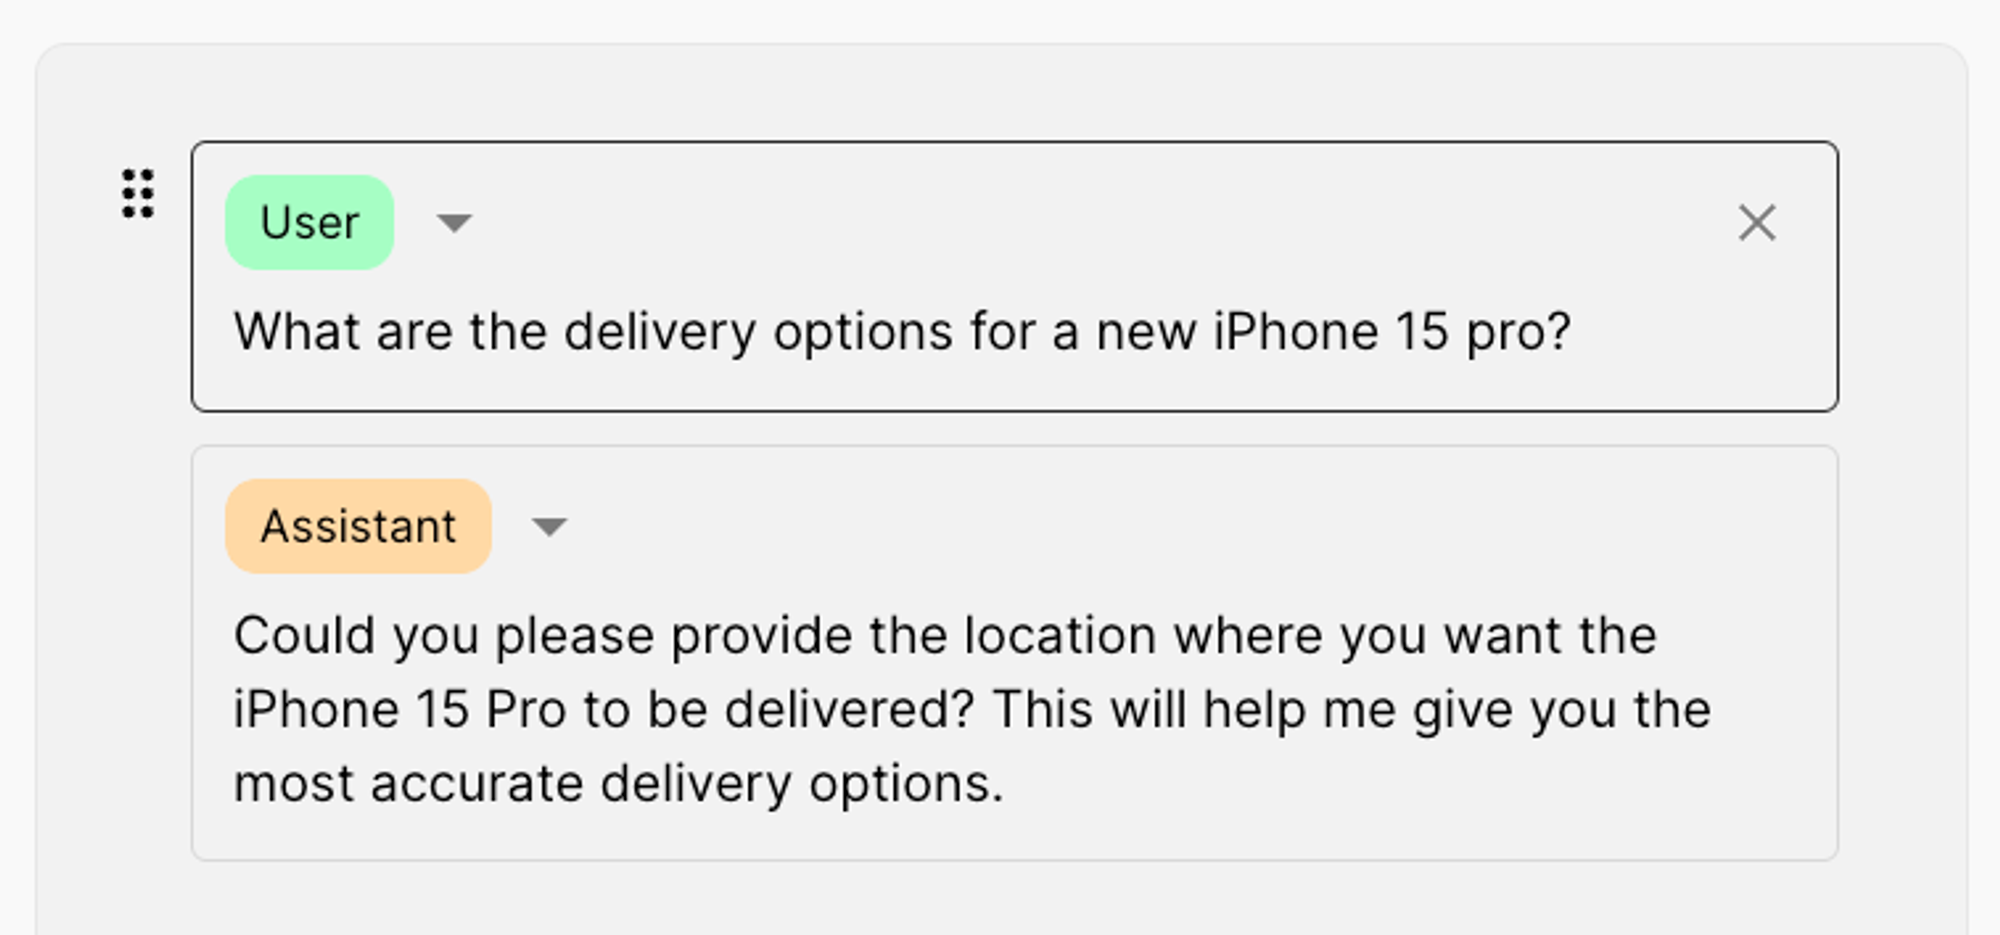
Case 1: Ask incomplete delivery questions
Works as intended, the model asks about the other required parameter: _location_.
Case 2: Closing the loop, Call the delivery_data function
Works as intended; the model provides the arbitrary answer we added in our function for the delivery_data function:
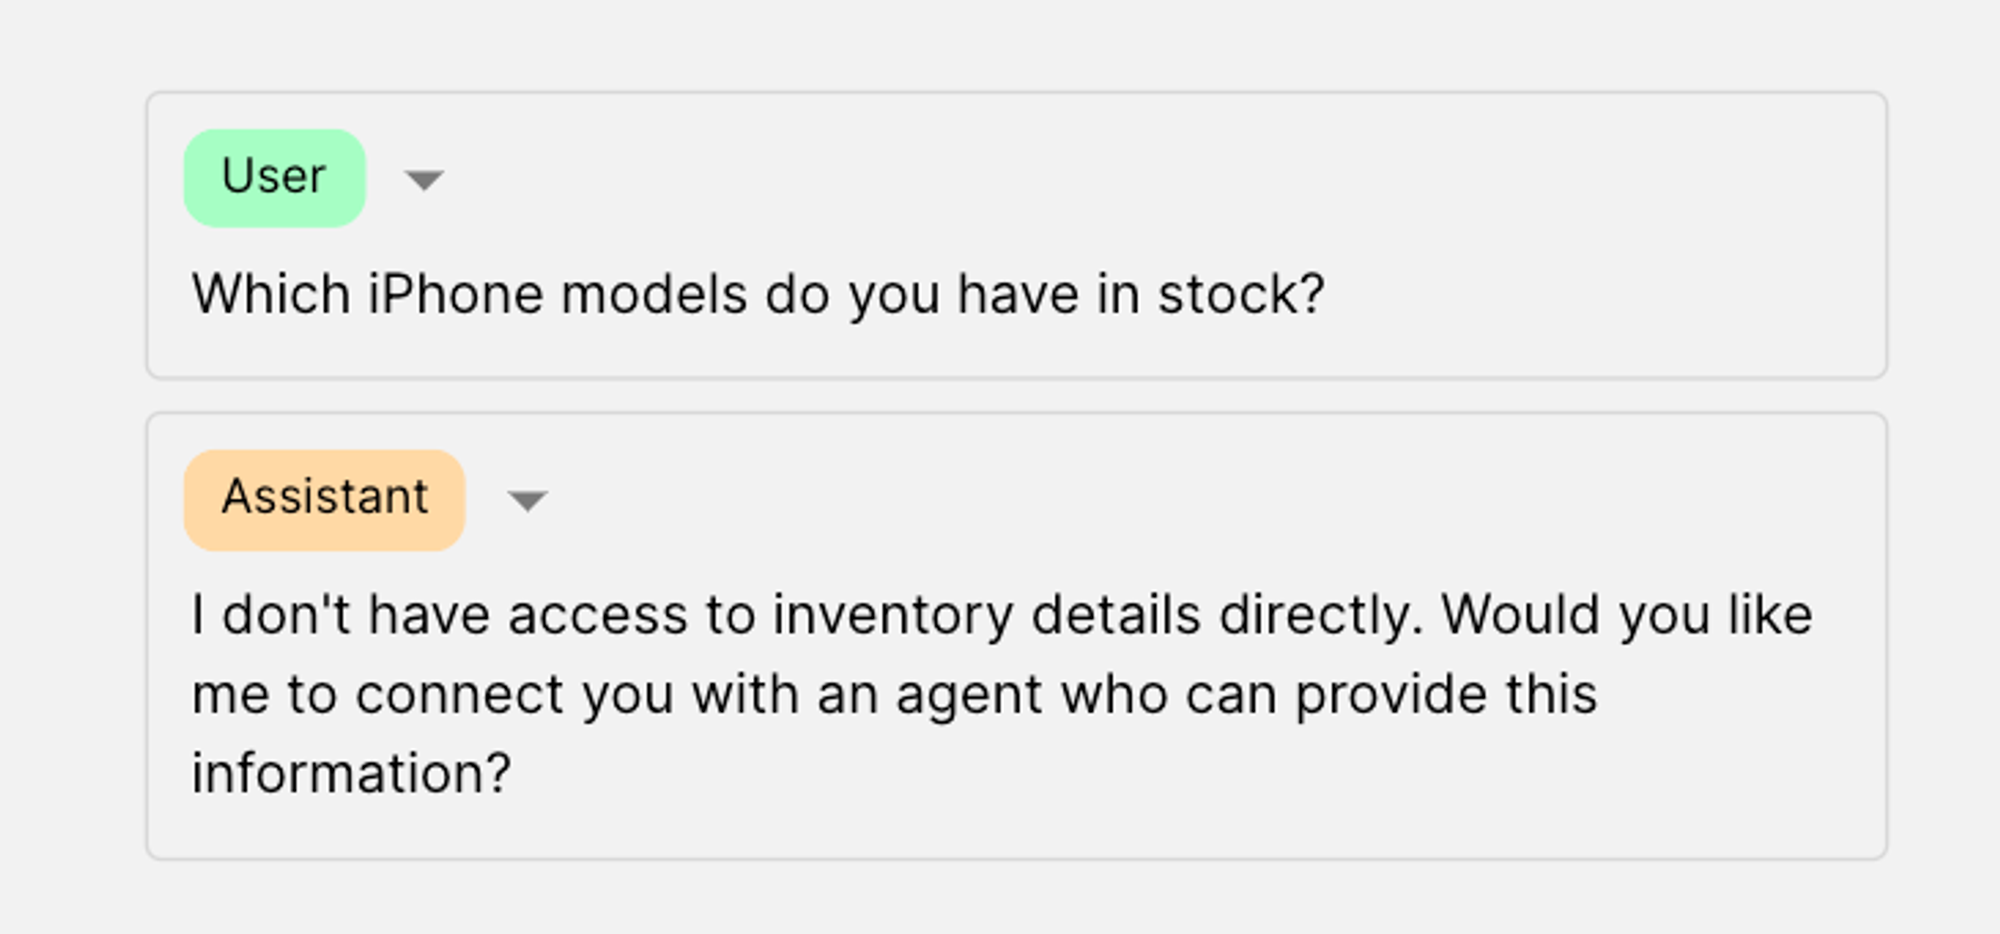
Case 3: Ask other questions
The model accurately follows the instructions and asks the user if they want to be connected with an agent:
Case 4: Call the call_agent function if user says yes
The model successfully runs the call_agent function and outputs the arbitrary answer we defined:
Conclusion
Hopefully, through this guide, you’ve learned how to effectively set up and utilize function calling with Chat Models in Vellum Workflows. By following the steps outlined, you can define functions or tools, enable models to auto-select or enforce function execution, pass function call outputs to your code, and run functions with the provided arguments. This powerful feature allows you to create sophisticated, AI-powered workflows that can handle complex user interactions and seamlessly integrate with your existing systems.
Quirks and Tips for Handling Functions
See below for a quick overview of some common scenarios for handling functions and passing them between nodes.
In all three examples, the Prompt Node returns text beyond just the function call. We show how to filter that away and pass the Function Call as part of an Array or on its own.
- Extracting an Array of multiple Function Calls with a Code Execution Node
- Extracting a single Function Call with a Code Execution Node
- Extracting a single Function Call with a Templating Node